No edit summary Tag: Visual edit |
mNo edit summary Tags: Visual edit apiedit |
||
| (27 intermediate revisions by 13 users not shown) | |||
| Line 1: | Line 1: | ||
| + | {{Infobox Aragami |
||
| − | {| border=0 cellpadding="0" width="100%" |
||
| + | |image = [[File:CorrosiveHD.png|280px]] |
||
| − | | rowspan="2" style="vertical-align: top;" | |
||
| + | |japanese = 腐食性ハンニバル |
||
| − | {{Aragami |
||
| + | |rōmaji = Fushokusei Hannibaru |
||
| − | |name = Corrosive Hannibal |
||
| + | |item = 幻影 / Phantom |
||
| − | |image = [[File:CorrosiveHD.png|250px]] |
||
| + | |origin = Oracle Manifestation Of Corporal Amamiya |
||
| − | |prefix = Phantom |
||
| + | |parts = Head<br />Scale (Back)<br />Wrist (Shield) |
||
| − | |origin = Unknown |
||
| − | |unbound = Head, Scale (Back) & Wrist (Shield) |
||
|attribute = Divine |
|attribute = Divine |
||
| − | |weakpoint = Head |
+ | |weakpoint = Head<br />Unbound Wrist |
| − | |weakness = Freeze/Spark/Divine |
+ | |weakness = Freeze<br />Spark<br />Divine |
| + | |species = [[Hannibal]]<br />[[Caligula]]<br />[[Spartacus]]<br />[[Rufus Caligula]]<br />[[Blitz Hannibal]]<br />[[Caligula Xeno]] |
||
| − | |||
| + | |game = ''[[God Eater Burst]]''<br />''[[God Eater 2]]''<br />''[[God Eater 2 Rage Burst]]''<br />''[[God Eater Resurrection]]'' |
||
| − | {{HeadingB|Related Species}} |
||
| + | |novel = |
||
| − | *[[Hannibal]] |
||
| + | |manga = |
||
| − | *[[Caligula]] |
||
| + | |resistance = Blaze |
||
| − | *[[Spartacus]] {{Tag|GE2 Only}} |
||
| + | }} |
||
| − | *[[Rufus Caligula]] {{Tag|GE2 Only}} |
||
| + | {{Template:Spoiler}} |
||
| − | *[[Blitz Hannibal]] {{Tag|GE2 Only}} |
||
| + | {| style="background:rgba(0, 0, 0, 0.6);color:#ffff99; padding:2px 2px 3px 2px; border-radius:2ex; border:1px solid transparent;" |
||
| − | |||
| + | ! style="background-color: rgba(179, 0, 0, 0.6);color:#ffffff;border-radius:10px 10px 0px 0px" align="center" |Aragami Information |
||
| − | | valign="top" style="padding-left:20px;"| |
||
| + | |- |
||
| − | {{HeadingB|NORN}} |
||
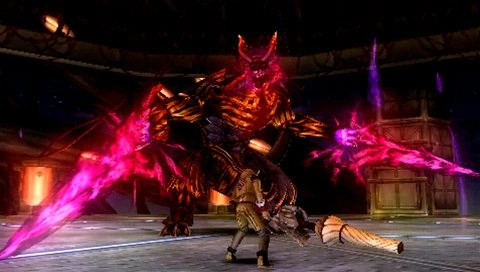
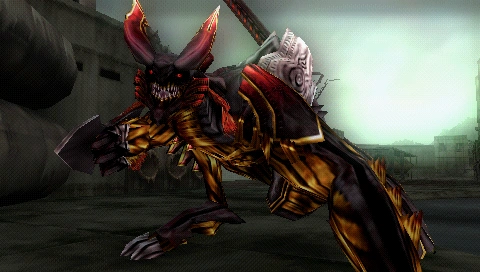
| + | |'''Corrosive Hannibal''' is a sub-species of [[Hannibal]] that first appeared in ''[[God Eater Burst]]''. |
||
| − | ''A dark Hannibal, which appeared as a post manifestation of the Oracle cell invasion of Corporal Amamiya. Several of the same species have been sighted near the Far East Branch; however, the relationship with the individual mentioned is still under investigation. This info is restricted to the Far East Branch.'' |
||
| − | |||
| − | {{HeadingB|Battle Information}} |
||
| + | The Corrosive Hannibal greatly resembles the standard strain of Hannibal, having the general shape of a wingless dragon with an armor-like bracer in one of its arms, and a large scale in its back that releases large amounts of fire if broken. However, the Corrosive subspecies differs itself from the original Hannibal in that it is "mirrored"; instead of possessing the bracer in the left arm, it has it in the right one; and more obviously they differ in their color schemes: rather than light grey and orange, the Corrosive variant is a dark shade of grey with red, yellow and purpledetails. Aditionally, the Corrosive Hannibal shows control over dark purple flames. |
||
| − | '''Blade Attacking Tips:'''<div class="mw-collapsible-content"> |
||
| − | *<u>''Pierce/Short Blades:''</u> Aim your melee attacks on the head, left arm and the intact scale. Continuously attacking the left arm will eventually inflict '''Down '''on Corrosive Hannibal. |
||
| − | *<u>''Sunder/Long Blades:''</u> Best weapon to use for disabling Corrosive Hannibal. Focus your attacks on the hind legs to inflict it into a '''Downed''' state. Keep attacking this part even while Corrosive Hannibal is downed, doing so will ensure it being downed again and making it unable to move until it dies. Alternative targets are the head, left arm and the intact scale. |
||
| − | *<u>''Crush/Buster Blades:''</u> Great for unbounding all of Corrosive Hannibal's body parts. Your primary targets should be the head, wrist and left arm. Continuously attacking the left arm will eventually inflict '''Down '''on Corrosive Hannibal. |
||
| − | *<u>''Elemental:''</u>'' ''Freeze, spark and divine elemental blades are effective on all of Corrosive Hannibal's body parts. |
||
| − | *Unbounding the head and wrist will make all melee and bullet attacks on it stronger while unbounding the scale will make it harden against all crush bullets and melee type attacks. |
||
| − | *Even if you're not using the best weapon for targeting the hind legs, attacking this part will easily send Corrosive Hannibal into a '''Downed''' state as compared to the right arm. |
||
| − | </div>'''Gun Attacking Tips:'''<div class="mw-collapsible-content"> |
||
| − | *<u>''Pierce/Assault and Sniper Gun:''</u> Aim your bullets on the scale and head to inflict above average/critical damage on Corrosive Hannibal. Unbounding the scale will make it slightly weaker against shot/laser bullets but will give Corrosive Hannibal access to his Firestorm attack. Shooting Corrosive Hannibal's own Blood Rage Aragami bullet on said parts is also effective. |
||
| − | *<u>''Crush/Blast Gun:''</u> The head, wrist and intact scale are your primary targets when using crush type bullets (including Corrosive Hannibal's own Aragami bullets). |
||
| − | *<u>''Elemental:''</u> You can use freeze, spark and/or divine elemental bullets on Corrosive Hannibal to augment your damage further. |
||
| − | </div>'''Status Resistances:'''<div class="mw-collapsible-content"> |
||
| − | {| border="0" cellpadding="2" cellspacing="2" width="100%" class="wikitable" |
||
| − | ! width="33%"|Condition |
||
| − | ! width="33%"|Resistance |
||
| − | ! width="33%"|Duration |
||
|- |
|- |
||
| + | ! style="background-color: rgba(179, 0, 0, 0.6);color:#ffffff" |Norn Database |
||
| − | | style="text-align: center; "|Hold |
||
| − | | style="text-align: center; "|High |
||
| − | | style="text-align: center; "|Normal |
||
|- |
|- |
||
| + | |The following information is taken from the offical in-game descriptions of the Aragami found in the NORN Terminal's database. |
||
| − | | style="text-align: center; "|Poison |
||
| − | | style="text-align: center; "|<span style="font-style: normal; ">Standard</span> |
||
| − | | style="text-align: center; "|Normal |
||
|- |
|- |
||
| + | | style="background: rgba(255, 255, 102, 0.6);color:#000000" |'''God Eater Resurrection''' |
||
| − | | style="text-align: center; "|Bind |
||
| + | |- |
||
| − | | style="text-align: center; "|<span style="font-style: normal; ">Low</span> |
||
| + | |''A dark Hannibal, which appeared as a post manifestation of the Oracle cell invasion of Corporal Amamiya. Several of the same species have been sighted near the Far East Branch; however, the relationship with the individual mentioned is still under investigation. '' |
||
| − | | style="text-align: center; "|Long |
||
| − | |} |
||
| − | </div>'''Enraged Effects:'''<div class="mw-collapsible-content"> |
||
| − | *<u>''Rage Indicator:''</u> Dark flame is mixed with its breathing. |
||
| − | *Corrosive Hannibal's attack, speed and aggressiveness will increase. |
||
| − | </div>'''Unbounding Tips:'''<div class="mw-collapsible-content"> |
||
| − | *<u>''Head:''</u> All melee and bullet attacks are effective in unbounding this part. But this part is difficult to aim without practice unless Corrosive Hannibal is in a downed state. |
||
| − | *<u>''Wrist:''</u> Buster blades with high melee crush attributes can easily unbound this part. |
||
| − | *<u>''Scale:''</u> All melee and bullet attacks are effective in unbounding this part. |
||
| − | </div>'''Other Useful Tips:'''<div class="mw-collapsible-content"> |
||
| − | *<u>''Weak Points:''</u> You can inflict '''[[Status Effects|Down]]''' on a Corrosive Hannibal by continuously attacking the following parts: |
||
| − | **Hind Legs using melee long blade attacks. Other blade types and bullets work but not as effective as long blades. |
||
| − | **Right Arm using any blade type with high physical attributes. |
||
| − | *Don't unbound the scale if you don't want Corrosive Hannibal to have access to his Firestorm attack. |
||
| − | *It's much easier to inflict down on Hannibal by targeting the hind legs as compared to the right arm. |
||
| − | *They usually stagger when their head and unbound wrist are hit by its weakness. |
||
| − | *Just like other large Aragami, Corrosive Hannibal will run away when they are low on health. |
||
| − | *There is a chance to devour this Aragami during or after it uses its double fire breath attack. |
||
| − | *Corrosive Hannibal's visual and hearing are average when compared to those of other Aragami. |
||
| − | </div> |
||
| + | ''This info is restricted to the Far East Branch.'' |
||
| + | ATK Element : Divine |
||
| + | Weaknesses : Freeze, Spark, Divine |
||
| + | |- |
||
| + | | style="background: rgba(255, 255, 102, 0.6);color:#000000" |'''God Eater 2 Rage Burst''' |
||
| + | |- |
||
| + | |''A black Hannibal seen only at the Far East Branch. The truth is unknown, but is theorized that this species was born from mutated Oracle Cells of an Infected God Eater. Few in number but stronger than typical Aragami. Can control black flames'' |
||
| + | ''The basic techniques for eliminating it are the same as the normal Aragami, but beware its rotating, reflective body parts.'' |
||
| + | ATK Element: Divine |
||
| − | {{HeadingB|Additional Information}} |
||
| − | *In the main plot line, when Lindow Amamiya loses his [[God Arc]] and Armlet, the Aragami transformation turns him into this creature. Luckily though, he is saved from this by [[Ren]] and [[Protagonist (God Eater)|the main protagonist]] of the story. |
||
| − | *Corrosive Hannibal has its wrist attached to its right arm while [[Hannibal]] on its left arm. |
||
| + | Weaknesses: Freeze, Spark, Divine |
||
| − | |||
| − | |||
| − | |||
| − | |||
| − | |||
| − | {{HeadingB|Aragami Bullets}} |
||
| − | {| width="100%" border="0" cellpadding="2" cellspacing="2" class="wikitable" |
||
| − | ! width="30%"|Name |
||
| − | !Attributes |
||
| − | !Description |
||
|- |
|- |
||
| + | ! style="background-color: rgba(179, 0, 0, 0.6);color:#ffffff" |Additional Information |
||
| − | |Elemental Decay |
||
| − | |Crush, Divine |
||
| − | |Fires 3 shadow balls to the target. |
||
|- |
|- |
||
| + | |<u>'''Trivia'''</u> |
||
| − | |Blood Rage |
||
| + | * This is the only subspecies of Aragami to ever become a final boss, specifically of the ''Burst'' storyline of ''God Eater''. |
||
| − | |Pierce, Divine |
||
| − | |Fire a shadow high piercing bullet. |
||
| − | |- |
||
| − | |Shadow Haze |
||
| − | |Pierce, Crush, Blaze, Divine |
||
| − | |Fires a swirling mass of black flame that tracks the nearest target for a short time before exploding. |
||
| − | |} |
||
| − | |} |
||
| + | <u>'''Story'''</u> |
||
| − | {{HeadingB|Defense Attributes}} |
||
| + | The Corrosive Hannibal is first sighted by the Defense Unit in the [[Sunken Grid]], where it quickly gets rid of two Kongou attacking them. Afterwards, it attacks [[Tatsumi O'Mori]], quickly defeating him. As the 2nd Unit is about to retreat, however, [[Protagonist (God Eater)|the Protagonist]] arrives and blocks its next attack, causing a strange resonance in which it is revealed that the Corrosive Hannibal is actually Lindow Amamiya's Aragami form. The Hannibal leaves quickly after the resonance is over. |
||
| + | After that revelation, the Protagonist goes to fight the Corrosive Hannibal alone, taking Lindow's God Arc with them to kill Lindow. However, after defeating the Hannibal, the Protagonist is unable to kill him, and instead enters a strange Resonance with Lindow's mind, where it manages to strengthen his consciousness in order to allow him fight a final battle against the Aragami. |
||
| − | <center>''The numbers below represent a percentage estimate of the Aragami's defense (From 1% to 100%) for the specified attributes. The higher the value, the weaker your attack will be.''</center> |
||
| − | <tabber> |
||
| − | Normal= |
||
| − | {| border="0" cellpadding="1" cellspacing="0" width="100%" class="wikitable" |
||
| − | ! rowspan="2" scope="col"|Part |
||
| − | ! colspan="2" rowspan="1" scope="col" style="text-align: center; "|Gun |
||
| − | ! colspan="3" rowspan="1" scope="col" style="text-align: center; "|Blade |
||
| − | ! colspan="4" rowspan="1" scope="col" style="text-align: center; "|Elemental |
||
| − | |- |
||
| − | ! scope="col" style="text-align: center; "|Crush |
||
| − | ! scope="col" style="text-align: center; "|Pierce |
||
| − | ! scope="col" style="text-align: center; "|Sunder |
||
| − | ! scope="col" style="text-align: center; "|Crush |
||
| − | ! scope="col" style="text-align: center; "|Pierce |
||
| − | ! scope="col" style="text-align: center; "|Blaze |
||
| − | ! scope="col" style="text-align: center; "|Freeze |
||
| − | ! scope="col" style="text-align: center; "|Spark |
||
| − | ! scope="col" style="text-align: center; "|Divine |
||
| − | |- |
||
| − | | style="white-space: nowrap; text-align: center; "|Head (Unbound) |
||
| − | | style="text-align: center; "|45 |
||
| − | | style="text-align: center; "|45 |
||
| − | | style="text-align: center; "|40 |
||
| − | | style="text-align: center; "|40 |
||
| − | | style="text-align: center; "|40 |
||
| − | | style="text-align: center; "|90 |
||
| − | | style="text-align: center; "|65 |
||
| − | | style="text-align: center; "|65 |
||
| − | | style="text-align: center; "|65 |
||
| − | |- |
||
| − | | style="white-space: nowrap; text-align: center; "|Neck |
||
| − | | style="text-align: center; "|75 |
||
| − | | style="text-align: center; "|75 |
||
| − | | style="text-align: center; "|75 |
||
| − | | style="text-align: center; "|75 |
||
| − | | style="text-align: center; "|75 |
||
| − | | style="text-align: center; "|90 |
||
| − | | style="text-align: center; "|75 |
||
| − | | style="text-align: center; "|75 |
||
| − | | style="text-align: center; "|75 |
||
| − | |- |
||
| − | | style="white-space: nowrap; text-align: center; "|Left Arm |
||
| − | | style="text-align: center; "|70 |
||
| − | | style="text-align: center; "|70 |
||
| − | | style="text-align: center; "|50 |
||
| − | | style="text-align: center; "|50 |
||
| − | | style="text-align: center; "|50 |
||
| − | | style="text-align: center; "|90 |
||
| − | | style="text-align: center; "|75 |
||
| − | | style="text-align: center; "|75 |
||
| − | | style="text-align: center; "|75 |
||
| − | |- |
||
| − | | style="white-space: nowrap; text-align: center; "|Wrist (Unbound) |
||
| − | | style="text-align: center; "|45 |
||
| − | | style="text-align: center; "|90 |
||
| − | | style="text-align: center; "|75 |
||
| − | | style="text-align: center; "|45 |
||
| − | | style="text-align: center; "|75 |
||
| − | | style="text-align: center; "|90 |
||
| − | | style="text-align: center; "|65 |
||
| − | | style="text-align: center; "|65 |
||
| − | | style="text-align: center; "|65 |
||
| − | |- |
||
| − | | style="white-space: nowrap; text-align: center; "|Body |
||
| − | | style="text-align: center; "|75 |
||
| − | | style="text-align: center; "|75 |
||
| − | | style="text-align: center; "|75 |
||
| − | | style="text-align: center; "|75 |
||
| − | | style="text-align: center; "|75 |
||
| − | | style="text-align: center; "|90 |
||
| − | | style="text-align: center; "|75 |
||
| − | | style="text-align: center; "|75 |
||
| − | | style="text-align: center; "|75 |
||
| − | |- |
||
| − | | style="white-space: nowrap; text-align: center; "|Scale (Unbound) |
||
| − | | style="text-align: center; "|25 |
||
| − | | style="text-align: center; "|25 |
||
| − | | style="text-align: center; "|40 |
||
| − | | style="text-align: center; "|45 |
||
| − | | style="text-align: center; "|20 |
||
| − | | style="text-align: center; "|90 |
||
| − | | style="text-align: center; "|25 |
||
| − | | style="text-align: center; "|25 |
||
| − | | style="text-align: center; "|25 |
||
| − | |- |
||
| − | | style="white-space: nowrap; text-align: center; "|Hind Legs |
||
| − | | style="text-align: center; "|70 |
||
| − | | style="text-align: center; "|70 |
||
| − | | style="text-align: center; "|50 |
||
| − | | style="text-align: center; "|75 |
||
| − | | style="text-align: center; "|75 |
||
| − | | style="text-align: center; "|90 |
||
| − | | style="text-align: center; "|75 |
||
| − | | style="text-align: center; "|75 |
||
| − | | style="text-align: center; "|75 |
||
| − | |- |
||
| − | | style="white-space: nowrap; text-align: center; "|Tail |
||
| − | | style="text-align: center; "|75 |
||
| − | | style="text-align: center; "|75 |
||
| − | | style="text-align: center; "|75 |
||
| − | | style="text-align: center; "|75 |
||
| − | | style="text-align: center; "|75 |
||
| − | | style="text-align: center; "|90 |
||
| − | | style="text-align: center; "|75 |
||
| − | | style="text-align: center; "|75 |
||
| − | | style="text-align: center; "|75 |
||
| − | |} |
||
| − | |-| |
||
| − | Unbound= |
||
| − | {| border="0" cellpadding="1" cellspacing="0" width="100%" class="wikitable" |
||
| − | ! rowspan="2" scope="col"|Part |
||
| − | ! colspan="2" rowspan="1" scope="col" style="text-align: center; "|Gun |
||
| − | ! colspan="3" rowspan="1" scope="col" style="text-align: center; "|Blade |
||
| − | ! colspan="4" rowspan="1" scope="col" style="text-align: center; "|Elemental |
||
| − | |- |
||
| − | ! scope="col" style="text-align: center; "|Crush |
||
| − | ! scope="col" style="text-align: center; "|Pierce |
||
| − | ! scope="col" style="text-align: center; "|Sunder |
||
| − | ! scope="col" style="text-align: center; "|Crush |
||
| − | ! scope="col" style="text-align: center; "|Pierce |
||
| − | ! scope="col" style="text-align: center; "|Blaze |
||
| − | ! scope="col" style="text-align: center; "|Freeze |
||
| − | ! scope="col" style="text-align: center; "|Spark |
||
| − | ! scope="col" style="text-align: center; "|Divine |
||
| − | |- |
||
| − | | style="white-space: nowrap; text-align: center; "|Head (Unbound) |
||
| − | | style="text-align: center; "|(20) |
||
| − | | style="text-align: center; "|(20) |
||
| − | | style="text-align: center; "|(10) |
||
| − | | style="text-align: center; "|(10) |
||
| − | | style="text-align: center; "|(10) |
||
| − | | style="text-align: center; "|90 |
||
| − | | style="text-align: center; "|(45) |
||
| − | | style="text-align: center; "|(45) |
||
| − | | style="text-align: center; "|(45) |
||
| − | |- |
||
| − | | style="white-space: nowrap; text-align: center; "|Neck |
||
| − | | style="text-align: center; "|75 |
||
| − | | style="text-align: center; "|75 |
||
| − | | style="text-align: center; "|75 |
||
| − | | style="text-align: center; "|75 |
||
| − | | style="text-align: center; "|75 |
||
| − | | style="text-align: center; "|90 |
||
| − | | style="text-align: center; "|75 |
||
| − | | style="text-align: center; "|75 |
||
| − | | style="text-align: center; "|75 |
||
| − | |- |
||
| − | | style="white-space: nowrap; text-align: center; "|Left Arm |
||
| − | | style="text-align: center; "|70 |
||
| − | | style="text-align: center; "|70 |
||
| − | | style="text-align: center; "|50 |
||
| − | | style="text-align: center; "|50 |
||
| − | | style="text-align: center; "|50 |
||
| − | | style="text-align: center; "|90 |
||
| − | | style="text-align: center; "|75 |
||
| − | | style="text-align: center; "|75 |
||
| − | | style="text-align: center; "|75 |
||
| − | |- |
||
| − | | style="white-space: nowrap; text-align: center; "|Wrist (Unbound) |
||
| − | | style="text-align: center; "|(10) |
||
| − | | style="text-align: center; "|(65) |
||
| − | | style="text-align: center; "|(35) |
||
| − | | style="text-align: center; "|(20) |
||
| − | | style="text-align: center; "|(40) |
||
| − | | style="text-align: center; "|90 |
||
| − | | style="text-align: center; "|(55) |
||
| − | | style="text-align: center; "|(55) |
||
| − | | style="text-align: center; "|(55) |
||
| − | |- |
||
| − | | style="white-space: nowrap; text-align: center; "|Body |
||
| − | | style="text-align: center; "|75 |
||
| − | | style="text-align: center; "|75 |
||
| − | | style="text-align: center; "|75 |
||
| − | | style="text-align: center; "|75 |
||
| − | | style="text-align: center; "|75 |
||
| − | | style="text-align: center; "|90 |
||
| − | | style="text-align: center; "|75 |
||
| − | | style="text-align: center; "|75 |
||
| − | | style="text-align: center; "|75 |
||
| − | |- |
||
| − | | style="white-space: nowrap; text-align: center; "|Scale (Unbound) |
||
| − | | style="text-align: center; "|(90) |
||
| − | | style="text-align: center; "|(20) |
||
| − | | style="text-align: center; "|(90) |
||
| − | | style="text-align: center; "|(90) |
||
| − | | style="text-align: center; "|(90) |
||
| − | | style="text-align: center; "|90 |
||
| − | | style="text-align: center; "|(35) |
||
| − | | style="text-align: center; "|(35) |
||
| − | | style="text-align: center; "|(35) |
||
| − | |- |
||
| − | | style="white-space: nowrap; text-align: center; "|Hind Legs |
||
| − | | style="text-align: center; "|70 |
||
| − | | style="text-align: center; "|70 |
||
| − | | style="text-align: center; "|50 |
||
| − | | style="text-align: center; "|75 |
||
| − | | style="text-align: center; "|75 |
||
| − | | style="text-align: center; "|90 |
||
| − | | style="text-align: center; "|75 |
||
| − | | style="text-align: center; "|75 |
||
| − | | style="text-align: center; "|75 |
||
| − | |- |
||
| − | | style="white-space: nowrap; text-align: center; "|Tail |
||
| − | | style="text-align: center; "|75 |
||
| − | | style="text-align: center; "|75 |
||
| − | | style="text-align: center; "|75 |
||
| − | | style="text-align: center; "|75 |
||
| − | | style="text-align: center; "|75 |
||
| − | | style="text-align: center; "|90 |
||
| − | | style="text-align: center; "|75 |
||
| − | | style="text-align: center; "|75 |
||
| − | | style="text-align: center; "|75 |
||
| − | |} |
||
| − | </tabber> |
||
| + | The Hannibal is eventually defeated when [[Ren]] sacrifices himself after revealing he's Lindow's God Arc. This allows Lindow to retake control of himself, albeit with his right arm permanently morphed into a monstrous state. |
||
| − | {{HeadingB|Aragami Materials}} |
||
| − | <tabber> |
||
| − | Devour Rates= |
||
| − | {| border="0" cellpadding="0" cellspacing="0" style="border-collapse: collapse;width:100%" width="100%" str="" class="wikitable" |
||
| − | |- height="20" style="height:15.0pt" |
||
| − | | class="xl65" height="40" rowspan="2" style="height:30pt;width:19pt;text-align:center;" width="25"|'''Pic''' |
||
| − | | class="xl65" rowspan="2" style="width:95pt;text-align:center;" width="127"|'''Material Name''' |
||
| − | | class="xl65" colspan="4" style="border-left-style:none;width:152pt;text-align:center;" width="200"|'''Devour Rates per Difficulty''' |
||
| − | |- height="20" style="height:15.0pt;color:inherit;margin-right:1px;padding-bottom: 2px;padding-top:2px" |
||
| − | | class="xl65" height="20" style="height:15pt;border-top-style:none;border-left-style:none;text-align:center;" num=""|'''10''' |
||
| − | | class="xl65" style="border-top-style:none;border-left-style:none;text-align:center;"|'''CH''' |
||
| − | | class="xl65" style="border-top-style:none;border-left-style:none;text-align:center;"|'''EX''' |
||
| − | | class="xl65" style="border-top-style:none;border-left-style:none;text-align:center;"|'''DLC''' |
||
| − | |- height="20" style="height:15.0pt" |
||
| − | | class="xl65" height="20" style="height:15pt;border-top-style:none;text-align:center;"|[[File:Rock.png|20px]] |
||
| − | | class="xl65" style="border-top-style:none;border-left-style:none;text-align:center;"|Phantom Armor |
||
| − | | class="xl66" style="border-top-style:none;border-left-style:none;color:inherit;text-align:center;" num="0.4"|40.00% |
||
| − | | class="xl66" style="border-top-style:none;border-left-style:none;color:inherit;text-align:center;" num="0.39600000000000002"|39.60% |
||
| − | | class="xl66" style="border-top-style:none;border-left-style:none;color:inherit;text-align:center;" num="0.39600000000000002"|39.60% |
||
| − | | class="xl66" style="border-top-style:none;border-left-style:none;color:inherit;text-align:center;" num="0.317"|31.70% |
||
| − | |- height="20" style="height:15.0pt" |
||
| − | | class="xl65" height="20" style="height:15pt;border-top-style:none;color:inherit;text-align:center;"|[[File:Rock.png|20px]] |
||
| − | | class="xl65" style="border-top-style:none;border-left-style:none;text-align:center;"|Phantom Horn |
||
| − | | class="xl66" style="border-top-style:none;border-left-style:none;color:inherit;text-align:center;" num="0.25"|25.00% |
||
| − | | class="xl66" style="border-top-style:none;border-left-style:none;color:inherit;text-align:center;" num="0.22800000000000001"|22.80% |
||
| − | | class="xl66" style="border-top-style:none;border-left-style:none;color:inherit;text-align:center;" num="0.218"|21.80% |
||
| − | | class="xl66" style="border-top-style:none;border-left-style:none;color:inherit;text-align:center;" num="0.35799999999999998"|35.80% |
||
| − | |- height="20" style="height:15.0pt" |
||
| − | | class="xl65" height="20" style="height:15pt;border-top-style:none;color:inherit;text-align:center;"|[[File:Rock.png|20px]] |
||
| − | | class="xl65" style="border-top-style:none;border-left-style:none;text-align:center;"|Phantom Fang |
||
| − | | class="xl66" style="border-top-style:none;border-left-style:none;color:inherit;text-align:center;" num="0.2"|20.00% |
||
| − | | class="xl66" style="border-top-style:none;border-left-style:none;color:inherit;text-align:center;" num="0.19800000000000001"|19.80% |
||
| − | | class="xl66" style="border-top-style:none;border-left-style:none;color:inherit;text-align:center;" num="0.19800000000000001"|19.80% |
||
| − | | class="xl66" style="border-top-style:none;border-left-style:none;color:inherit;text-align:center;" num="0.16300000000000001"|16.30% |
||
| − | |- height="20" style="height:15.0pt" |
||
| − | | class="xl65" height="20" style="height:15pt;border-top-style:none;color:inherit;text-align:center;"|[[File:Rock.png|20px]] |
||
| − | | class="xl65" style="border-top-style:none;border-left-style:none;text-align:center;"|Phantom Helm |
||
| − | | class="xl66" style="border-top-style:none;border-left-style:none;color:inherit;text-align:center;" num="0.1"|10.00% |
||
| − | | class="xl66" style="border-top-style:none;border-left-style:none;color:inherit;text-align:center;" num="9.9000000000000005E-2"|9.90% |
||
| − | | class="xl66" style="border-top-style:none;border-left-style:none;color:inherit;text-align:center;" num="9.9000000000000005E-2"|9.90% |
||
| − | | class="xl66" style="border-top-style:none;border-left-style:none;color:inherit;text-align:center;" num="8.1000000000000003E-2"|8.10% |
||
| − | |- height="20" style="height:15.0pt" |
||
| − | | class="xl65" height="20" style="height:15pt;border-top-style:none;color:inherit;text-align:center;"|[[File:Beaker.png|20px]] |
||
| − | | class="xl65" style="border-top-style:none;border-left-style:none;text-align:center;"|Phantom Ambrosia |
||
| − | | class="xl66" style="border-top-style:none;border-left-style:none;color:inherit;text-align:center;" num="0.05"|5.00% |
||
| − | | class="xl66" style="border-top-style:none;border-left-style:none;color:inherit;text-align:center;" num="7.9000000000000001E-2"|7.90% |
||
| − | | class="xl66" style="border-top-style:none;border-left-style:none;color:inherit;text-align:center;" num="8.8999999999999996E-2"|8.90% |
||
| − | | class="xl66" style="border-top-style:none;border-left-style:none;color:inherit;text-align:center;" num="8.1000000000000003E-2"|8.10% |
||
| − | |} |
||
| − | |-| |
||
| − | Unbound Bonus Rates= |
||
| − | {| border="0" cellpadding="0" cellspacing="0" style="border-collapse: collapse;width:100%" width="100%" str="" class="wikitable" |
||
| − | |- height="20" style="height:15.0pt" |
||
| − | | class="xl65" height="40" rowspan="2" style="height:30pt;width:30pt;color:inherit;text-align:center;" width="40"|'''Part''' |
||
| − | | class="xl65" rowspan="2" style="width:19pt;text-align:center;" width="25"|'''Pic''' |
||
| − | | class="xl65" rowspan="2" style="width:101pt;text-align:center;" width="134"|'''Material Name''' |
||
| − | | class="xl65" colspan="4" style="border-left-style:none;width:152pt;text-align:center;" width="200"|'''Bonus Rates per Difficulty''' |
||
| − | |- height="20" style="height:15.0pt;color:inherit;margin-right:1px;padding-bottom: 2px;padding-top:2px" |
||
| − | | class="xl65" height="20" style="height:15pt;border-top-style:none;border-left-style:none;text-align:center;" num=""|'''10''' |
||
| − | | class="xl65" style="border-top-style:none;border-left-style:none;text-align:center;"|'''CH''' |
||
| − | | class="xl65" style="border-top-style:none;border-left-style:none;text-align:center;"|'''EX''' |
||
| − | | class="xl65" style="border-top-style:none;border-left-style:none;text-align:center;"|'''DLC''' |
||
| − | |- height="20" style="height:15.0pt;color:inherit;margin-right:1px;padding-bottom: 2px;padding-top:2px" |
||
| − | | class="xl65" height="60" rowspan="3" style="height:45pt;border-top-style:none;color:inherit;text-align:center;"|Head |
||
| − | | class="xl65" style="border-top-style:none;border-left-style:none;text-align:center;"|[[File:Rock.png|20px]] |
||
| − | | class="xl65" style="border-top-style:none;border-left-style:none;text-align:center;"|Phantom Horn |
||
| − | | class="xl66" style="border-top-style:none;border-left-style:none;color:inherit;text-align:center;" num="0.38900000000000001"|38.90% |
||
| − | | class="xl66" style="border-top-style:none;border-left-style:none;color:inherit;text-align:center;" num="0.38900000000000001"|38.90% |
||
| − | | class="xl66" style="border-top-style:none;border-left-style:none;color:inherit;text-align:center;" num="0.38900000000000001"|38.90% |
||
| − | | class="xl66" style="border-top-style:none;border-left-style:none;color:inherit;text-align:center;" num="0.35"|35.00% |
||
| − | |- height="20" style="height:15.0pt" |
||
| − | | class="xl65" height="20" style="height:15pt;border-top-style:none;border-left-style:none;color:inherit;text-align:center;"|[[File:Rock.png|20px]] |
||
| − | | class="xl65" style="border-top-style:none;border-left-style:none;text-align:center;"|Phantom Helm |
||
| − | | class="xl66" style="border-top-style:none;border-left-style:none;text-align:center;" num="0.38900000000000001"|38.90% |
||
| − | | class="xl66" style="border-top-style:none;border-left-style:none;text-align:center;" num="0.38900000000000001"|38.90% |
||
| − | | class="xl66" style="border-top-style:none;border-left-style:none;text-align:center;" num="0.38900000000000001"|38.90% |
||
| − | | class="xl66" style="border-top-style:none;border-left-style:none;text-align:center;" num="0.35"|35.00% |
||
| − | |- height="20" style="height:15.0pt" |
||
| − | | class="xl65" height="20" style="height:15pt;border-top-style:none;border-left-style:none;text-align:center;"|[[File:Rock.png|20px]] |
||
| − | | class="xl65" style="border-top-style:none;border-left-style:none;text-align:center;"|Phantom Fang |
||
| − | | class="xl66" style="border-top-style:none;border-left-style:none;text-align:center;" num="0.222"|22.20% |
||
| − | | class="xl66" style="border-top-style:none;border-left-style:none;text-align:center;" num="0.222"|22.20% |
||
| − | | class="xl66" style="border-top-style:none;border-left-style:none;text-align:center;" num="0.222"|22.20% |
||
| − | | class="xl66" style="border-top-style:none;border-left-style:none;text-align:center;" num="0.3"|30.00% |
||
| − | |- height="20" style="height:15.0pt;color:inherit;margin-right:1px;padding-bottom: 2px;padding-top:2px" |
||
| − | | class="xl65" height="60" rowspan="3" style="height:45pt;border-top-style:none;color:inherit;text-align:center;"|Wrist |
||
| − | | class="xl65" style="border-top-style:none;border-left-style:none;text-align:center;"|[[File:Rock.png|20px]] |
||
| − | | class="xl65" style="border-top-style:none;border-left-style:none;text-align:center;"|Phantom Armor |
||
| − | | class="xl66" style="border-top-style:none;border-left-style:none;color:inherit;text-align:center;" num="0.45"|45.00% |
||
| − | | class="xl66" style="border-top-style:none;border-left-style:none;color:inherit;text-align:center;" num="0.5"|50.00% |
||
| − | | class="xl66" style="border-top-style:none;border-left-style:none;color:inherit;text-align:center;" num="0.5"|50.00% |
||
| − | | class="xl66" style="border-top-style:none;border-left-style:none;color:inherit;text-align:center;" num="0.5"|50.00% |
||
| − | |- height="20" style="height:15.0pt" |
||
| − | | class="xl65" height="20" style="height:15pt;border-top-style:none;border-left-style:none;color:inherit;text-align:center;"|[[File:Rock.png|20px]] |
||
| − | | class="xl65" style="border-top-style:none;border-left-style:none;text-align:center;"|Phantom Cataphract |
||
| − | | class="xl66" style="border-top-style:none;border-left-style:none;text-align:center;" num="0.4"|40.00% |
||
| − | | class="xl66" style="border-top-style:none;border-left-style:none;text-align:center;" num="0.35"|35.00% |
||
| − | | class="xl66" style="border-top-style:none;border-left-style:none;text-align:center;" num="0.35"|35.00% |
||
| − | | class="xl66" style="border-top-style:none;border-left-style:none;text-align:center;" num="0.35"|35.00% |
||
| − | |- height="20" style="height:15.0pt" |
||
| − | | class="xl65" height="20" style="height:15pt;border-top-style:none;border-left-style:none;text-align:center;"|[[File:Beaker.png|20px]] |
||
| − | | class="xl65" style="border-top-style:none;border-left-style:none;text-align:center;"|Phantom Ambrosia |
||
| − | | class="xl66" style="border-top-style:none;border-left-style:none;text-align:center;" num="0.15"|15.00% |
||
| − | | class="xl66" style="border-top-style:none;border-left-style:none;text-align:center;" num="0.15"|15.00% |
||
| − | | class="xl66" style="border-top-style:none;border-left-style:none;text-align:center;" num="0.15"|15.00% |
||
| − | | class="xl66" style="border-top-style:none;border-left-style:none;text-align:center;" num="0.15"|15.00% |
||
| − | |- height="20" style="height:15.0pt;color:inherit;margin-right:1px;padding-bottom: 2px;padding-top:2px" |
||
| − | | class="xl65" height="80" rowspan="4" style="height:60pt;border-top-style:none;color:inherit;text-align:center;"|Scale |
||
| − | | class="xl65" style="border-top-style:none;border-left-style:none;text-align:center;"|[[File:Beaker.png|20px]] |
||
| − | | class="xl65" style="border-top-style:none;border-left-style:none;text-align:center;"|Phantom Stone |
||
| − | | class="xl66" style="border-top-style:none;border-left-style:none;color:inherit;text-align:center;" num="0.4"|40.00% |
||
| − | | class="xl66" style="border-top-style:none;border-left-style:none;color:inherit;text-align:center;" num="0.38100000000000001"|38.10% |
||
| − | | class="xl66" style="border-top-style:none;border-left-style:none;color:inherit;text-align:center;" num="0.374"|37.40% |
||
| − | | class="xl66" style="border-top-style:none;border-left-style:none;color:inherit;text-align:center;" num="0.4"|40.00% |
||
| − | |- height="20" style="height:15.0pt" |
||
| − | | class="xl65" height="20" style="height:15pt;border-top-style:none;border-left-style:none;color:inherit;text-align:center;"|[[File:Rock.png|20px]] |
||
| − | | class="xl65" style="border-top-style:none;border-left-style:none;text-align:center;"|Phantom Armor |
||
| − | | class="xl66" style="border-top-style:none;border-left-style:none;text-align:center;" num="0.38100000000000001"|38.10% |
||
| − | | class="xl66" style="border-top-style:none;border-left-style:none;text-align:center;" num="0.38100000000000001"|38.10% |
||
| − | | class="xl66" style="border-top-style:none;border-left-style:none;text-align:center;" num="0.374"|37.40% |
||
| − | | class="xl66" style="border-top-style:none;border-left-style:none;text-align:center;" num="0.3"|30.00% |
||
| − | |- height="20" style="height:15.0pt" |
||
| − | | class="xl65" height="20" style="height:15pt;border-top-style:none;border-left-style:none;text-align:center;"|[[File:Beaker.png|20px]] |
||
| − | | class="xl65" style="border-top-style:none;border-left-style:none;text-align:center;"|Seraphic Crystal |
||
| − | | class="xl66" style="border-top-style:none;border-left-style:none;text-align:center;" num="0.14299999999999999"|14.30% |
||
| − | | class="xl66" style="border-top-style:none;border-left-style:none;text-align:center;" num="0.14299999999999999"|14.30% |
||
| − | | class="xl66" style="border-top-style:none;border-left-style:none;text-align:center;" num="0.14"|14.00% |
||
| − | | class="xl66" style="border-top-style:none;border-left-style:none;text-align:center;" num="0.15"|15.00% |
||
| − | |- height="20" style="height:15.0pt" |
||
| − | | class="xl65" height="20" style="height:15pt;border-top-style:none;border-left-style:none;text-align:center;"|[[File:Beaker.png|20px]] |
||
| − | | class="xl65" style="border-top-style:none;border-left-style:none;text-align:center;"|Phantom Ambrosia |
||
| − | | class="xl66" style="border-top-style:none;border-left-style:none;text-align:center;" num="7.5999999999999998E-2"|7.60% |
||
| − | | class="xl66" style="border-top-style:none;border-left-style:none;text-align:center;" num="9.5000000000000001E-2"|9.50% |
||
| − | | class="xl66" style="border-top-style:none;border-left-style:none;text-align:center;" num="0.112"|11.20% |
||
| − | | class="xl66" style="border-top-style:none;border-left-style:none;text-align:center;" num="0.15"|15.00% |
||
| − | |} |
||
| − | </tabber> |
||
| − | '''Notes:''' |
||
| − | *EX rates are only applicable to the challenge [[missions|mission]]: Black Ore (ブラック・オア). |
||
| − | *DLC rates are only applicable to the following DLC [[missions]]: |
||
| − | **Here Here Here (鬼さんこちら). |
||
| − | **Demon Extermination (鬼退治). |
||
| − | *DLC missions excluded above will either use difficulty 10 or CH rates. |
||
| + | The Corrosive Hannibal sightings continued after these events; however, their relation to the original one is unknown. |
||
| − | {{HeadingB|Screenshots}} |
||
| − | {| border="0" cellpadding="5" cellspacing="0" |
||
| − | |bgcolor="#3c5074" align="center" style="border:1px solid #aaaaaa;"|[[File:Argami_2.png|200px]] |
||
| − | |bgcolor="#3c5074" align="center" style="border:1px solid #aaaaaa;"|[[File:Corrosivehannibal-1.png|200px]] |
||
| − | |bgcolor="#3c5074" align="center" style="border:1px solid #aaaaaa;"|[[File:Corrosivehannibal-2.png|200px]] |
||
| − | |- |
||
| − | |bgcolor="#3c5074" align="center" style="border:1px solid #aaaaaa;"|[[File:Corrosive Hannibal1.jpg|200px]] |
||
|} |
|} |
||
| + | For battle information check the [[Corrosive Hannibal/Advanced Information|Advanced Information]] page. |
||
| − | '''Concept Art''' |
||
| + | {| style="background:rgba(0, 0, 0, 0.6);color:#ffff99; padding:2px 2px 3px 2px; border-radius:2ex; border:1px solid transparent;" |
||
| − | ---- |
||
| + | ! colspan="3" style="background-color: rgba(179, 0, 0, 0.6);color:#ffffff;border-radius:10px 10px 0px 0px" align="center" |'''Gallery''' |
||
| − | {| border="0" cellpadding="5" cellspacing="0" |
||
| + | |- valign="top" |
||
| − | |bgcolor="#3c5074" align="center" style="border:1px solid #aaaaaa;"|[[File:Dark-Hannibal.jpg|200px]] |
||
| + | |[[File:Corrosivehannibal-2.png|thumb|210x210px|centre]] |
||
| + | |[[File:Argami_2.png|none|thumb|210x210px]] |
||
| + | |[[File:DarkLord-3.jpg|none|thumb|210x210px]] |
||
|} |
|} |
||
| + | View the [[Corrosive Hannibal/Gallery|Gallery]] to see more images & videos or add new ones. |
||
| − | |||
| − | {{HeadingB| Gameplay Videos}} |
||
| − | [[File:Gods Eater Burst Rank 10 - True Moon In The Welkin|425px]] |
||
[[Category:Aragami]] |
[[Category:Aragami]] |
||
| + | [[Category:Large sized Aragami]] |
||
Revision as of 12:15, 14 February 2017
| Spoiler Warning: | This page contains crucial story details. |
| Aragami Information |
|---|
| Corrosive Hannibal is a sub-species of Hannibal that first appeared in God Eater Burst.
The Corrosive Hannibal greatly resembles the standard strain of Hannibal, having the general shape of a wingless dragon with an armor-like bracer in one of its arms, and a large scale in its back that releases large amounts of fire if broken. However, the Corrosive subspecies differs itself from the original Hannibal in that it is "mirrored"; instead of possessing the bracer in the left arm, it has it in the right one; and more obviously they differ in their color schemes: rather than light grey and orange, the Corrosive variant is a dark shade of grey with red, yellow and purpledetails. Aditionally, the Corrosive Hannibal shows control over dark purple flames. |
| Norn Database |
| The following information is taken from the offical in-game descriptions of the Aragami found in the NORN Terminal's database. |
| God Eater Resurrection |
| A dark Hannibal, which appeared as a post manifestation of the Oracle cell invasion of Corporal Amamiya. Several of the same species have been sighted near the Far East Branch; however, the relationship with the individual mentioned is still under investigation.
This info is restricted to the Far East Branch. ATK Element : Divine Weaknesses : Freeze, Spark, Divine |
| God Eater 2 Rage Burst |
| A black Hannibal seen only at the Far East Branch. The truth is unknown, but is theorized that this species was born from mutated Oracle Cells of an Infected God Eater. Few in number but stronger than typical Aragami. Can control black flames
The basic techniques for eliminating it are the same as the normal Aragami, but beware its rotating, reflective body parts. ATK Element: Divine Weaknesses: Freeze, Spark, Divine |
| Additional Information |
Trivia
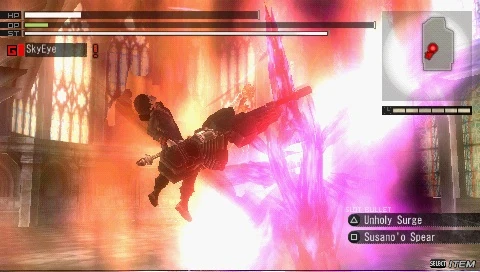
Story The Corrosive Hannibal is first sighted by the Defense Unit in the Sunken Grid, where it quickly gets rid of two Kongou attacking them. Afterwards, it attacks Tatsumi O'Mori, quickly defeating him. As the 2nd Unit is about to retreat, however, the Protagonist arrives and blocks its next attack, causing a strange resonance in which it is revealed that the Corrosive Hannibal is actually Lindow Amamiya's Aragami form. The Hannibal leaves quickly after the resonance is over. After that revelation, the Protagonist goes to fight the Corrosive Hannibal alone, taking Lindow's God Arc with them to kill Lindow. However, after defeating the Hannibal, the Protagonist is unable to kill him, and instead enters a strange Resonance with Lindow's mind, where it manages to strengthen his consciousness in order to allow him fight a final battle against the Aragami. The Hannibal is eventually defeated when Ren sacrifices himself after revealing he's Lindow's God Arc. This allows Lindow to retake control of himself, albeit with his right arm permanently morphed into a monstrous state. The Corrosive Hannibal sightings continued after these events; however, their relation to the original one is unknown. |
For battle information check the Advanced Information page.
| Gallery | ||
|---|---|---|
 |
 | |
View the Gallery to see more images & videos or add new ones.