(Undo revision 71779 by Roinelll (talk)) Tag: rte-wysiwyg |
(Adding categories) |
||
| (25 intermediate revisions by 13 users not shown) | |||
| Line 1: | Line 1: | ||
| − | {{Infobox Aragami |
||
| − | |image = [[File:Vajura.png|280px]] |
||
| − | |japanese = ヴァジュラ |
||
| − | |rōmaji = Vajura |
||
| − | |item = 獣神 / Chimera |
||
| − | |origin = Southwest Eurasia |
||
| − | |parts = Head<br />Front Legs<br />Tail |
||
| − | |attribute = Spark |
||
| − | |weakpoint = Tail (Pierce)<br />Head (Crush) |
||
| − | |weakness = Divine |
||
| − | |species = [[Dyaus Pita (Resurrection)]]<br />[[Sky Father (Dyaus Pita)]]<br />[[Prithvi Mata]]<br />[[Ravana]]<br />[[Golden Vajra]] |
||
| − | |game = ''[[God Eater (Game)|God Eater]]''<br />''[[God Eater Burst]]''<br />''[[God Eater 2]]''<br />''[[God Eater 2 Rage Burst]]'' |
||
| − | |novel = |
||
| − | |manga = |
||
| − | |resistance = Spark}}'''Vajra''' is a medium sized tiger-like Aragami first introduced in [[God Eater (Game)|God Eater]] that possesses the ability to harness the power of lightning to attack its enemies. |
||
| + | {| style="background:rgba(0, 0, 0, 0.2);color:#ffffff; border-radius:2ex; border:1px solid transparent;" |
||
| − | ==NORN== |
||
| + | | colspan="3" |{{Infobox Aragami |
||
| + | |image = [[File:Vajura.png|280px]]|japanese = ヴァジュラ|rōmaji = Vajura|item = 獣神 / Chimera|origin = Southwest Eurasia|parts = Head<br />Front Legs<br />Tail|attribute = Spark|weakpoint = Tail (Sunder)<br />Head (Crush)<br> Body (Pierce)|weakness = Blaze <br> Freeze <br> Divine|species = [[Dyaus Pita (God Eater Resurrection)]]<br />[[Balmung]]<br />[[Dyaus Pita (Heavenly Father)]]<br />[[Prithvi Mata]]<br />[[Ravana]]<br />[[Golden Vajra]]<br />[[Arius Nova]]<br />[[Arius Nova (Larval)]]<br />[[Balfa Mata]]|game = ''[[God Eater (Game)|God Eater]]''<br />''[[God Eater Burst]]''<br />''[[God Eater 2]]''<br />''[[God Eater 2 Rage Burst]]'' <br> ''[[God Eater Resurrection]]''<br/>''[[God Eater Online]]''<br/>''[[God Eater 3]]''|novel = |manga = |resistance = Spark|name = Vajra}}'''Vajra''' is a large sized tiger-like [[Aragami ]] first introduced in ''[[God Eater (Game)|God Eater]]'' that possesses the ability to harness the power of lightning to attack its enemies. |
||
| + | <h2 style="padding:5px; background-color: rgba(77, 0, 0, 1); color:white; text-align:center; -moz-border-radius:10px; ">Norn Database</h2> |
||
| + | |||
| + | |||
| + | |||
| + | The following information can also be found via descriptions of the Aragami found in the NORN Terminal's database. |
||
| + | |||
| + | <h3 style="padding:5px; background-color: rgba(255, 255, 102, 0.6); color:black; text-align:left; -moz-border-radius:10px; ">'''God Eater Burst'''</h3> |
||
| + | |||
| + | |||
| + | |||
''A giant Aragami resembling a tiger. Moves so fast and can easily outmaneuver the enemy. Unleashes electric shocks from the cape-like organ on its back. First appeared in southwestern Eurasia, but can now be found throughout the continent.'' |
''A giant Aragami resembling a tiger. Moves so fast and can easily outmaneuver the enemy. Unleashes electric shocks from the cape-like organ on its back. First appeared in southwestern Eurasia, but can now be found throughout the continent.'' |
||
| − | ''Vulnerable in the front legs, abdomen and tail. When it's activated by rage, stun grenades can immobilize it for a longer time, so use them aggressively.'' |
+ | ''Vulnerable in the front legs, abdomen and tail. When it's activated by rage, stun grenades can immobilize it for a longer time, so use them aggressively'''.''''' |
| + | <h3 style="padding:5px; background-color: rgba(255, 255, 102, 0.6); color:black; text-align:left; -moz-border-radius:10px; ">'''God Eater 2 Rage Burst/Resurrection'''</h3> |
||
| − | ==Music Theme== |
||
| + | |||
| + | |||
| + | |||
| + | ''An Aragami similar in appearance to a tiger. Toys with enemies with its agile movements. Can loose a powerful electric attack from its "cape," an organ on its back. Native to southeast Eurasia, it is now found throughout the continent.'' |
||
| + | |||
| + | ''It has multiple weak points, including its head, forelegs, tail and torso. When active, stun grenade duration is increased.'' |
||
| + | |||
| + | ''ATK Element : Spark'' |
||
| + | |||
| + | ''Weaknesses : Blaze, Freeze, Divine'' |
||
| + | |||
| + | <h3 style="padding:5px; background-color: rgba(255, 255, 102, 0.6); color:black; text-align:left; -moz-border-radius:10px; ">'''God Eater 3'''</h3> |
||
| + | |||
| + | |||
| + | |||
| + | ''An Aragami similar in appearance to a tiger. '' |
||
| + | ''Toys with enemies with its agile movements. Can loose a powerful electric attack from its "cape," an organ on its back. '' |
||
| + | ''Its cape crackles with charge when it's ready to release a shock attack, so if you see it light up, it would be wise to avoid aerial attacks for a short while.'' |
||
| + | |||
| + | ''ATK Element : Spark'' |
||
| + | |||
| + | ''Weaknesses : Blaze, Freeze, Divine'' |
||
| + | |||
| + | <h3 style="padding:5px; background-color: rgba(77, 0, 0, 1); color:white; text-align:center; -moz-border-radius:10px; ">Additional Information</h3> |
||
| + | |||
| + | |||
| + | |||
| + | <u>'''Music Theme'''</u> |
||
*'''Shadows Over the City - Fear -''' |
*'''Shadows Over the City - Fear -''' |
||
*'''Shadows Over the City - Roar -''' |
*'''Shadows Over the City - Roar -''' |
||
| − | <br style="clear:both;"/> |
||
| − | ==Battle Information== |
||
| + | <u>'''Trivia'''</u> |
||
| − | <div class="mw-collapsible mw-collapsed" style="width:100%>'''Attacks:'''<div class="mw-collapsible-content"> |
||
| + | *The Vajra is the flagship [[Aragami]] of the original ''God Eater''. |
||
| − | *<u>''Vajra Claw:''</u> Vajra uses its claws to slash his enemies. Evade by stepping out of the way. |
||
| + | *Its name comes from a Sanskrit word, [http://en.wikipedia.org/wiki/Vajra Vajra], meaning both thunderbolt and diamond. |
||
| − | *<u style="font-style:inherit;font-weight:inherit;">''Vajra Pounce:''</u> Vajra pounces onto its enemy, knocking them away. Evade by effectively moving to the Vajra's side. |
||
| + | *Its right sabertooth is always broken even if its head is not unbound. |
||
| − | *<u>''Lightning Torpedoes:''</u> Vajra summons five ligthning balls in front of him, then releases them in a wide fan-like fashion. Evade by moving towards Vajra's side. |
||
| + | *As part of the ''God Eater'' collaborative content in ''[[Tales of Zestiria]]'', the player can fight a special gauntlet battle against of multiple waves of Aragami, including Vajras as well as multitudes of [[Ogretail]]s and [[Chi-You]]s. |
||
| − | *<u>''Grand Lightning:''</u> Vajra performs a pouncng stance and curl his tail forward, conjuring a large homing lightning ball and unleashing it. Evade by effectively moving to Vajra's side. |
||
| + | *The Vajra appears as a rival unit in [https://projectxzone.fandom.com/wiki/Project_X_Zone Project X Zone], along with other smaller Aragami (Ogretails, Kongou and Cocoon Maidens among others) as enemies. |
||
| − | *<u>''Leaping Thunder:''</u> Vajra leaps high then throws three large lightning balls to the ground, the sommersault away. Evade by effectively keeping distance and moving to Vajra's side. |
||
| + | *The origin of the Vajra in ''God Eater Burst'' is listed as from the South West Eurasia, while ''[[God Eater Resurrection|Resurrection]] '' and ''[[God Eater 2 Rage Burst|Rage Burst]]'' mentions it's from South East. |
||
| − | *<u>''Backflip:''</u>'' With ''Similar performance with Leaping Thunder, a fake out and also an evasive maneuver. |
||
| + | |||
| − | *<u>''Lightning Maul:''</u> Vajra summons a large spherical lightning field on the ground where his target is. Evade by effectively moving out of the lightning field. |
||
| + | |||
| − | *<u>''Thunderous Maul:''</u> The Vajra roars and blasts the area his standing on with a lightning field. Hard to evade when in melee-range, stick with readily guarding it. |
||
| − | The following is/can used when his Scale has been unbound. |
||
| − | *<u>''Lightning Bust:''</u> Vajra performs a pouncing attack. When his lands, he blast the ground with lightning field. |
||
| − | </div> |
||
| − | <div class="mw-collapsible mw-collapsed" style="width:100%>'''Blade Attacking Tips:'''<div class="mw-collapsible-content"> |
||
| − | *<u>''Pierce/Short Blades:''</u> This is the quickest way to kill a Vajra. Attack the hind legs and the torso for maximum damage. Consistently attacking the hind legs will allow you to inflict a '''Down '''on Vajra. Paige sword works the best. |
||
| − | *<u>''Sunder/Long Blades:''</u> Your primary target should be the front legs and the tail. Impulse Edge is also effective on the head, use it whenever you get a chance. Unbound the front legs, head and tail will make your sunder attacks even more powerful. Consistently attacking the front legs will allow you to inflict '''Down '''on Vajra. |
||
| − | *<u>''Crush/Buster Blades:''</u> The Most difficult way to kill a Vajra as the head is the only part that is weak to crush attacks. The only chance to use Charge Crush is when Vajra is inflicted with Down, Hold or is flinching. Consistently attacking the head will make the Vajra flinch. |
||
| − | *<u>''Elemental:''</u> Vajra is weakest weak to divine blade attacks but using blaze and freeze attributes are also effective. |
||
| − | </div> |
||
| + | For battle information check the [[/Advanced Information/]] page. |
||
| − | <div class="mw-collapsible mw-collapsed" style="width:100%>'''Gun Attacking Tips:'''<div class="mw-collapsible-content"> |
||
| − | *<u>''Pierce/Assault and Sniper Gun:''</u> The best type of bullets to use against a Vajra. Aim for its torso and hind legs to optimize your damage output. High piercing bullets are also effective, shoot the head and let the bullet pierce through the Vajra's torso and hind legs as this will guarantee you to inflict '''Stagger'''. Consistently shooting the hind legs will allow you to inflict '''Down '''on a Vajra. |
||
| − | *<u>''Crush/Blast Gun:''</u> The Worst type of bullet to use against a Vajra, Is the crush/blast gun bullets as its head is the only part that is weak to crush attacks. Use homing or pseudo homing bombs or radials as these will automatically target the head when properly aimed. Vajra's own Aragami bullets are also effective against its head. |
||
| − | *<u>''Elemental:''</u> Vajra is most weak to divine bullets but using blaze and freeze attributes are also effective. |
||
| − | </div> |
||
| − | <div class="mw-collapsible mw-collapsed" style="width:100%>'''Status Resistances:'''<div class="mw-collapsible-content"> |
||
| − | {| border="0" cellpadding="2" cellspacing="2" width="100%" class="wikitable" |
||
| − | ! width="33%"|Condition |
||
| − | ! width="33%"|Resistance |
||
| − | ! width="33%"|Duration |
||
|- |
|- |
||
| + | | colspan="3" |<h3 style="padding:5px; background-color: rgba(77, 0, 0, 1); color:white; text-align:center; -moz-border-radius:10px; ">'''Gallery'''</h3> |
||
| − | | style="text-align: center; "|Hold |
||
| + | |- valign="top" |
||
| − | | style="text-align: center; "|Standard |
||
| + | |[[File:GOD_EATER_RESURRECTION_体験版_20160127004353.jpg|thumb|210x210px]] |
||
| − | | style="text-align: center; "|Normal |
||
| + | |[[File:Vajra-screenshot7.jpg|thumb|210x210px]] |
||
| + | |[[File:Vajra-screenshot5.jpg|thumb|210x210px]] |
||
|- |
|- |
||
| + | | colspan="3" |View the [[/Gallery/]] to see more images & videos or add new ones. |
||
| − | | style="text-align: center; "|Poison |
||
| + | <h3 style="padding:5px; background-color: rgba(77, 0, 0, 1); color:white; text-align:center; -moz-border-radius:10px; ">See Also (related species)</h3> |
||
| − | | style="text-align: center; "|<span style="font-style: normal; ">Standard</span> |
||
| − | | style="text-align: center; "|Normal |
||
| − | |- |
||
| − | | style="text-align: center; "|Bind |
||
| − | | style="text-align: center; "|Standard |
||
| − | | style="text-align: center; "|Normal |
||
| − | |} |
||
| − | </div> |
||
| − | <div class="mw-collapsible mw-collapsed" style="width:100%>'''Enraged Effects:'''<div class="mw-collapsible-content"> |
||
| − | *<u>''Rage Indicator:''</u> Heavy breathing. |
||
| − | *Vajra's attack power, aggressiveness and speed will noticeably increase and it will pounce on the player more often. |
||
| − | *Its right claw attack and lightning maul shot will have an additional '''Stun''' effect. |
||
| − | *True to its in game description, it will be stunned longer via Stun Grenades when enraged. |
||
| − | </div> |
||
| − | <div class="mw-collapsible mw-collapsed" style="width:100%>'''Unbounding Tips:'''<div class="mw-collapsible-content"> |
||
| − | *<u>''Front Legs:''</u> Use sunder triangle attacks to quickly unbound the front legs with minimal effort. |
||
| − | *<u>''Head:''</u> Buster Blades, Impulse Edge and homing bomb/radial bullets can easily unbound the head. |
||
| − | *<u>''Tail:''</u> Using aerial combos with Long Blades is the easiest way to unbound the tail. Wait for Vajra to land from a pounce attack then attack the tail. |
||
| − | </div> |
||
| − | <div class="mw-collapsible mw-collapsed" style="width:100%>'''Other Useful Tips:'''<div class="mw-collapsible-content"> |
||
| − | *<u>''Weak Points:''</u> You can inflict '''Down''' on a Vajra by continuously attacking the following parts: |
||
| − | **Inflict down on Front legs using Long Blades. |
||
| − | **Inflict Down on Hind legs using Short Blades (Paige variations), Charge Spears (GE2) or shot/laser bullets. |
||
| − | *They usually stagger when their head is hit by crush attacks. |
||
| − | *When Vajra's HP is low, it will run away to recover health. |
||
| − | *Has average visual and auditory senses as compared to other Aragami. |
||
| − | *When binded, Vajra's spark dome attack will be disabled. |
||
| − | *There is a chance to devour this Aragami whenever it's charging up its lightning torpedoes attack. |
||
| − | *The cape is the hardest part of a Vajra and is nearly impenetrable. Avoid attacking this part at all costs. |
||
| − | </div> |
||
| − | ==Aragami Bullets== |
||
| − | {{HeadingC|God Eater Burst}} |
||
| − | {| width="100%" border="0" cellpadding="2" cellspacing="2" class="wikitable" |
||
| − | ! width="30%"|Name |
||
| − | !Attributes |
||
| − | !Description |
||
| − | |- |
||
| − | |Lightning Torpedoes |
||
| − | |Crush, Spark |
||
| − | |Launches 5 powerful lightning shots in a tight fan formation that vibrate in front of the shooter for a few seconds before exploding. Great for flank attacks. |
||
| − | |- |
||
| − | |Grand Lightning |
||
| − | |Crush, Spark |
||
| − | |Launches a single, homing lightning shot. |
||
| − | |- |
||
| − | |Lightning Maul |
||
| − | |Crush, Spark |
||
| − | |Launches a lightning shot. On contact with an enemy, it expands to enormous size. After a second, the expanded orb explodes, damaging everything inside. Can inflict Hold. |
||
| − | |} |
||
| + | [[Vajra]], [[Dyaus Pita (God Eater Resurrection)]], [[Dyaus Pita (Heavenly Father)]], [[Prithvi Mata]], [[Ravana]], [[Golden Vajra]], [[Arius Nova]], [[Arius Nova (Larval)]], [[Balfa Mata]]. |
||
| − | {{HeadingC|God Eater 2}} |
||
| − | {| width="100%" border="0" cellpadding="2" cellspacing="2" class="wikitable" |
||
| − | ! width="30%"|Name |
||
| − | ! width="30%"|Gun Type |
||
| − | !Attributes |
||
| − | !Description |
||
| − | |- |
||
| − | |貫通紫電<br />(Piercing Lance) |
||
| − | |Sniper |
||
| − | |Crush, Spark |
||
| − | |<span class="notranslate" style="">Fires an Advanced Piercing bullet.</span> |
||
| − | |- |
||
| − | |スピットボルト<br />(Spitfire) |
||
| − | |Assault |
||
| − | |Crush, Spark |
||
| − | |<span class="notranslate" style="">Fires 3 homing bullets.</span> |
||
| − | |- |
||
| − | |雷槌<br />(Lightning Maul) |
||
| − | |Blast |
||
| − | |Crush, Spark |
||
| − | |Launches a lightning shot. On contact with an enemy, it expands to enormous size. After a second, the expanded orb explodes, damaging everything inside. Can inflict Hold. |
||
| − | |- |
||
| − | |ボルトチャリオット<br />(Bolt Chariot) |
||
| − | |Shotgun |
||
| − | |Crush, Spark |
||
| − | |Shoots three orbs that follow the gunner in mid air and explodes when something touches it or after a certain period of time lapses. |
||
| − | |} |
||
| + | <h3 style="padding:5px; background-color: rgba(77, 0, 0, 1); color:white; text-align:center; -moz-border-radius:10px; ">Other Large Aragami</h3> |
||
| − | ==Defense Attributes== |
||
| − | <center>''The numbers below represent a percentage estimate of the Aragami's defense (From 1% to 100%) for the specified attributes. The higher the value, the weaker your attack will be.''</center><tabber> |
||
| − | Normal= |
||
| − | {| border="0" cellpadding="1" cellspacing="0" width="100%" class="wikitable" |
||
| − | ! rowspan="2" scope="col"|Part |
||
| − | ! colspan="2" rowspan="1" scope="col" style="text-align: center; "|Gun |
||
| − | ! colspan="3" rowspan="1" scope="col" style="text-align: center; "|Blade |
||
| − | ! colspan="4" rowspan="1" scope="col" style="text-align: center; "|Elemental |
||
| − | |- |
||
| − | ! scope="col" style="text-align: center; "|Crush |
||
| − | ! scope="col" style="text-align: center; "|Pierce |
||
| − | ! scope="col" style="text-align: center; "|Sunder |
||
| − | ! scope="col" style="text-align: center; "|Crush |
||
| − | ! scope="col" style="text-align: center; "|Pierce |
||
| − | ! scope="col" style="text-align: center; "|Blaze |
||
| − | ! scope="col" style="text-align: center; "|Freeze |
||
| − | ! scope="col" style="text-align: center; "|Spark |
||
| − | ! scope="col" style="text-align: center; "|Divine |
||
| − | |- |
||
| − | | style="white-space: nowrap; text-align: center; "|Front Legs (Unbound) |
||
| − | | style="text-align: center; "|80 |
||
| − | | style="text-align: center; "|80 |
||
| − | | style="text-align: center; "|40 |
||
| − | | style="text-align: center; "|90 |
||
| − | | style="text-align: center; "|95 |
||
| − | | style="text-align: center; "|70 |
||
| − | | style="text-align: center; "|70 |
||
| − | | style="text-align: center; "|90 |
||
| − | | style="text-align: center; "|70 |
||
| − | |- |
||
| − | | style="white-space: nowrap; text-align: center; "|Head (Unbound) |
||
| − | | style="text-align: center; "|20 |
||
| − | | style="text-align: center; "|70 |
||
| − | | style="text-align: center; "|65 |
||
| − | | style="text-align: center; "|15 |
||
| − | | style="text-align: center; "|65 |
||
| − | | style="text-align: center; "|50 |
||
| − | | style="text-align: center; "|50 |
||
| − | | style="text-align: center; "|90 |
||
| − | | style="text-align: center; "|30 |
||
| − | |- |
||
| − | | style="white-space: nowrap; text-align: center; "|Cape |
||
| − | | style="text-align: center; "|100 |
||
| − | | style="text-align: center; "|100 |
||
| − | | style="text-align: center; "|100 |
||
| − | | style="text-align: center; "|100 |
||
| − | | style="text-align: center; "|100 |
||
| − | | style="text-align: center; "|100 |
||
| − | | style="text-align: center; "|100 |
||
| − | | style="text-align: center; "|100 |
||
| − | | style="text-align: center; "|100 |
||
| − | |- |
||
| − | | style="white-space: nowrap; text-align: center; "|Torso |
||
| − | | style="text-align: center; "|90 |
||
| − | | style="text-align: center; "|5 |
||
| − | | style="text-align: center; "|60 |
||
| − | | style="text-align: center; "|80 |
||
| − | | style="text-align: center; "|20 |
||
| − | | style="text-align: center; "|30 |
||
| − | | style="text-align: center; "|30 |
||
| − | | style="text-align: center; "|90 |
||
| − | | style="text-align: center; "|20 |
||
| − | |- |
||
| − | | style="white-space: nowrap; text-align: center; "|Hind Legs |
||
| − | | style="text-align: center; "|60 |
||
| − | | style="text-align: center; "|40 |
||
| − | | style="text-align: center; "|80 |
||
| − | | style="text-align: center; "|80 |
||
| − | | style="text-align: center; "|25 |
||
| − | | style="text-align: center; "|70 |
||
| − | | style="text-align: center; "|70 |
||
| − | | style="text-align: center; "|90 |
||
| − | | style="text-align: center; "|65 |
||
| − | |- |
||
| − | | style="white-space: nowrap; text-align: center; "|Tail (Unbound) |
||
| − | | style="text-align: center; "|70 |
||
| − | | style="text-align: center; "|70 |
||
| − | | style="text-align: center; "|20 |
||
| − | | style="text-align: center; "|80 |
||
| − | | style="text-align: center; "|40 |
||
| − | | style="text-align: center; "|30 |
||
| − | | style="text-align: center; "|30 |
||
| − | | style="text-align: center; "|90 |
||
| − | | style="text-align: center; "|20 |
||
| − | |} |
||
| − | |-| |
||
| − | Unbound= |
||
| − | {| border="0" cellpadding="1" cellspacing="0" width="100%" class="wikitable" |
||
| − | ! rowspan="2" scope="col"|Part |
||
| − | ! colspan="2" rowspan="1" scope="col" style="text-align: center; "|Gun |
||
| − | ! colspan="3" rowspan="1" scope="col" style="text-align: center; "|Blade |
||
| − | ! colspan="4" rowspan="1" scope="col" style="text-align: center; "|Elemental |
||
| − | |- |
||
| − | ! scope="col" style="text-align: center; "|Crush |
||
| − | ! scope="col" style="text-align: center; "|Pierce |
||
| − | ! scope="col" style="text-align: center; "|Sunder |
||
| − | ! scope="col" style="text-align: center; "|Crush |
||
| − | ! scope="col" style="text-align: center; "|Pierce |
||
| − | ! scope="col" style="text-align: center; "|Blaze |
||
| − | ! scope="col" style="text-align: center; "|Freeze |
||
| − | ! scope="col" style="text-align: center; "|Spark |
||
| − | ! scope="col" style="text-align: center; "|Divine |
||
| − | |- |
||
| − | | style="white-space: nowrap; text-align: center; "|Front Legs (Unbound) |
||
| − | | style="text-align: center; "|(50) |
||
| − | | style="text-align: center; "|(50) |
||
| − | | style="text-align: center; "|(15) |
||
| − | | style="text-align: center; "|(80) |
||
| − | | style="text-align: center; "|(85) |
||
| − | | style="text-align: center; "|(60) |
||
| − | | style="text-align: center; "|(60) |
||
| − | | style="text-align: center; "|90 |
||
| − | | style="text-align: center; "|(60) |
||
| − | |- |
||
| − | | style="white-space: nowrap; text-align: center; "|Head (Unbound) |
||
| − | | style="text-align: center; "|(5) |
||
| − | | style="text-align: center; "|(40) |
||
| − | | style="text-align: center; "|(30) |
||
| − | | style="text-align: center; "|(5) |
||
| − | | style="text-align: center; "|(40) |
||
| − | | style="text-align: center; "|(40) |
||
| − | | style="text-align: center; "|(40) |
||
| − | | style="text-align: center; "|90 |
||
| − | | style="text-align: center; "|(20) |
||
| − | |- |
||
| − | | style="white-space: nowrap; text-align: center; "|Cape |
||
| − | | style="text-align: center; "|100 |
||
| − | | style="text-align: center; "|100 |
||
| − | | style="text-align: center; "|100 |
||
| − | | style="text-align: center; "|100 |
||
| − | | style="text-align: center; "|100 |
||
| − | | style="text-align: center; "|100 |
||
| − | | style="text-align: center; "|100 |
||
| − | | style="text-align: center; "|100 |
||
| − | | style="text-align: center; "|100 |
||
| − | |- |
||
| − | | style="white-space: nowrap; text-align: center; "|Torso |
||
| − | | style="text-align: center; "|90 |
||
| − | | style="text-align: center; "|5 |
||
| − | | style="text-align: center; "|60 |
||
| − | | style="text-align: center; "|80 |
||
| − | | style="text-align: center; "|20 |
||
| − | | style="text-align: center; "|30 |
||
| − | | style="text-align: center; "|30 |
||
| − | | style="text-align: center; "|90 |
||
| − | | style="text-align: center; "|20 |
||
| − | |- |
||
| − | | style="white-space: nowrap; text-align: center; "|Hind Legs |
||
| − | | style="text-align: center; "|60 |
||
| − | | style="text-align: center; "|40 |
||
| − | | style="text-align: center; "|80 |
||
| − | | style="text-align: center; "|80 |
||
| − | | style="text-align: center; "|25 |
||
| − | | style="text-align: center; "|70 |
||
| − | | style="text-align: center; "|70 |
||
| − | | style="text-align: center; "|90 |
||
| − | | style="text-align: center; "|65 |
||
| − | |- |
||
| − | | style="white-space: nowrap; text-align: center; "|Tail (Unbound) |
||
| − | | style="text-align: center; "|(40) |
||
| − | | style="text-align: center; "|(40) |
||
| − | | style="text-align: center; "|(5) |
||
| − | | style="text-align: center; "|(60) |
||
| − | | style="text-align: center; "|(20) |
||
| − | | style="text-align: center; "|30 |
||
| − | | style="text-align: center; "|30 |
||
| − | | style="text-align: center; "|90 |
||
| − | | style="text-align: center; "|20 |
||
| − | |} |
||
| − | </tabber> |
||
| + | |||
| − | ==Aragami Materials== |
||
| + | [[Vajra]], [[Quadriga]], [[Sariel]], [[Borg Camlann]], [[Hannibal]], [[Caligula]], [[Marduk]], [[Demiurge]], [[Ouroboros]], [[Arda Nova]] |
||
| − | <tabber> |
||
| − | Devour Rates= |
||
| − | {| border="0" cellpadding="0" cellspacing="0" style="border-collapse: collapse;width:100%" width="100%" str="" class="wikitable" |
||
| − | |- height="36" style="mso-height-source:userset;height:27.0pt" |
||
| − | | class="xl25" height="53" rowspan="2" style="height:39.75pt;width:20pt;text-align:center;" width="27"|'''Pic''' |
||
| − | | class="xl25" rowspan="2" style="width:130pt;text-align:center;" width="156"|'''Material Name''' |
||
| − | | class="xl22" colspan="7" style="border-left-style:none;width:336pt;text-align:center;" width="448"|'''Devour Rates per Difficulty''' |
||
| − | |- height="17" style="height:12.75pt" |
||
| − | | class="xl22" height="17" style="height:12.75pt;border-top-style:none;border-left-style:none;width:48pt;padding-bottom:3px;padding-top:3px;text-align:center;" width="64" num=""|'''3''' |
||
| − | | class="xl22" style="border-top-style:none;border-left-style:none;width:48pt;padding-bottom:3px;padding-top:3px;text-align:center;" width="64" num=""|'''4''' |
||
| − | | class="xl22" style="border-top-style:none;border-left-style:none;width:48pt;padding-bottom:3px;padding-top:3px;text-align:center;" width="64" num=""|'''5''' |
||
| − | | class="xl22" style="border-top-style:none;border-left-style:none;width:48pt;padding-bottom:3px;padding-top:3px;text-align:center;" width="64" num=""|'''6''' |
||
| − | | class="xl22" style="border-top-style:none;border-left-style:none;width:48pt;padding-bottom:3px;padding-top:3px;text-align:center;" width="64" num=""|'''8''' |
||
| − | | class="xl22" style="border-top-style:none;border-left-style:none;width:48pt;padding-bottom:3px;padding-top:3px;text-align:center;" width="64" num=""|'''9''' |
||
| − | | class="xl22" style="border-top-style:none;border-left-style:none;width:48pt;padding-bottom:3px;padding-top:3px;text-align:center;" width="64"|'''CH''' |
||
| − | |- height="17" style="height:12.75pt" |
||
| − | | class="xl27" height="17" style="height:12.75pt;border-top-style:none;padding-bottom:3px;padding-top:3px;text-align:center;"|[[File:Skin.png|20px]] |
||
| − | | class="xl23" style="border-top-style:none;border-left-style:none;width:117pt;padding-bottom:3px;padding-top:3px;text-align:center;" width="156"|Chimera Fur |
||
| − | | class="xl24" style="border-top-style:none;border-left-style:none;width:48pt;padding-bottom:3px;padding-top:3px;text-align:center;" width="64" num="0.45"|45.00% |
||
| − | | class="xl23" style="border-top-style:none;border-left-style:none;width:48pt;padding-bottom:3px;padding-top:3px;text-align:center;" width="64"| - |
||
| − | | class="xl23" style="border-top-style:none;border-left-style:none;width:48pt;padding-bottom:3px;padding-top:3px;text-align:center;" width="64"| - |
||
| − | | class="xl23" style="border-top-style:none;border-left-style:none;width:48pt;padding-bottom:3px;padding-top:3px;text-align:center;" width="64"| - |
||
| − | | class="xl23" style="border-top-style:none;border-left-style:none;width:48pt;padding-bottom:3px;padding-top:3px;text-align:center;" width="64"| - |
||
| − | | class="xl23" style="border-top-style:none;border-left-style:none;width:48pt;padding-bottom:3px;padding-top:3px;text-align:center;" width="64"| - |
||
| − | | class="xl23" style="border-top-style:none;border-left-style:none;width:48pt;padding-bottom:3px;padding-top:3px;text-align:center;" width="64"| - |
||
| − | |- height="17" style="height:12.75pt" |
||
| − | | class="xl27" height="17" style="height:12.75pt;border-top-style:none;padding-bottom:3px;padding-top:3px;text-align:center;"|[[File:Skin.png|20px]] |
||
| − | | class="xl23" style="border-top-style:none;border-left-style:none;width:117pt;padding-bottom:3px;padding-top:3px;text-align:center;" width="156"|Chimera Wing |
||
| − | | class="xl24" style="border-top-style:none;border-left-style:none;width:48pt;padding-bottom:3px;padding-top:3px;text-align:center;" width="64" num="0.37"|37.00% |
||
| − | | class="xl23" style="border-top-style:none;border-left-style:none;width:48pt;padding-bottom:3px;padding-top:3px;text-align:center;" width="64"| - |
||
| − | | class="xl23" style="border-top-style:none;border-left-style:none;width:48pt;padding-bottom:3px;padding-top:3px;text-align:center;" width="64"| - |
||
| − | | class="xl23" style="border-top-style:none;border-left-style:none;width:48pt;padding-bottom:3px;padding-top:3px;text-align:center;" width="64"| - |
||
| − | | class="xl23" style="border-top-style:none;border-left-style:none;width:48pt;padding-bottom:3px;padding-top:3px;text-align:center;" width="64"| - |
||
| − | | class="xl23" style="border-top-style:none;border-left-style:none;width:48pt;padding-bottom:3px;padding-top:3px;text-align:center;" width="64"| - |
||
| − | | class="xl23" style="border-top-style:none;border-left-style:none;width:48pt;padding-bottom:3px;padding-top:3px;text-align:center;" width="64"| - |
||
| − | |- height="17" style="height:12.75pt" |
||
| − | | class="xl27" height="17" style="height:12.75pt;border-top-style:none;padding-bottom:3px;padding-top:3px;text-align:center;"|[[File:Rock.png|20px]] |
||
| − | | class="xl23" style="border-top-style:none;border-left-style:none;width:117pt;padding-bottom:3px;padding-top:3px;text-align:center;" width="156"|Chimera Claw |
||
| − | | class="xl24" style="border-top-style:none;border-left-style:none;width:48pt;padding-bottom:3px;padding-top:3px;text-align:center;" width="64" num="0.1"|10.00% |
||
| − | | class="xl23" style="border-top-style:none;border-left-style:none;width:48pt;padding-bottom:3px;padding-top:3px;text-align:center;" width="64"| - |
||
| − | | class="xl23" style="border-top-style:none;border-left-style:none;width:48pt;padding-bottom:3px;padding-top:3px;text-align:center;" width="64"| - |
||
| − | | class="xl23" style="border-top-style:none;border-left-style:none;width:48pt;padding-bottom:3px;padding-top:3px;text-align:center;" width="64"| - |
||
| − | | class="xl23" style="border-top-style:none;border-left-style:none;width:48pt;padding-bottom:3px;padding-top:3px;text-align:center;" width="64"| - |
||
| − | | class="xl23" style="border-top-style:none;border-left-style:none;width:48pt;padding-bottom:3px;padding-top:3px;text-align:center;" width="64"| - |
||
| − | | class="xl23" style="border-top-style:none;border-left-style:none;width:48pt;padding-bottom:3px;padding-top:3px;text-align:center;" width="64"| - |
||
| − | |- height="17" style="height:12.75pt" |
||
| − | | class="xl27" height="17" style="height:12.75pt;border-top-style:none;padding-bottom:3px;padding-top:3px;text-align:center;"|[[File:Beaker.png|20px]] |
||
| − | | class="xl23" style="border-top-style:none;border-left-style:none;width:117pt;padding-bottom:3px;padding-top:3px;text-align:center;" width="156"|Generator |
||
| − | | class="xl24" style="border-top-style:none;border-left-style:none;width:48pt;padding-bottom:3px;padding-top:3px;text-align:center;" width="64" num="0.08"|8.00% |
||
| − | | class="xl24" style="border-top-style:none;border-left-style:none;width:48pt;padding-bottom:3px;padding-top:3px;text-align:center;" width="64" num="0.08"|8.00% |
||
| − | | class="xl24" style="border-top-style:none;border-left-style:none;width:48pt;padding-bottom:3px;padding-top:3px;text-align:center;" width="64" num="0.08"|8.00% |
||
| − | | class="xl24" style="border-top-style:none;border-left-style:none;width:48pt;padding-bottom:3px;padding-top:3px;text-align:center;" width="64" num="0.09"|9.00% |
||
| − | | class="xl23" style="border-top-style:none;border-left-style:none;width:48pt;padding-bottom:3px;padding-top:3px;text-align:center;" width="64"| - |
||
| − | | class="xl23" style="border-top-style:none;border-left-style:none;width:48pt;padding-bottom:3px;padding-top:3px;text-align:center;" width="64"| - |
||
| − | | class="xl23" style="border-top-style:none;border-left-style:none;width:48pt;padding-bottom:3px;padding-top:3px;text-align:center;" width="64"| - |
||
| − | |- height="17" style="height:12.75pt" |
||
| − | | class="xl27" height="17" style="height:12.75pt;border-top-style:none;padding-bottom:3px;padding-top:3px;text-align:center;"|[[File:Skin.png|20px]] |
||
| − | | class="xl23" style="border-top-style:none;border-left-style:none;width:117pt;padding-bottom:3px;padding-top:3px;text-align:center;" width="156"|Chimera Spark Fur |
||
| − | | class="xl23" style="border-top-style:none;border-left-style:none;width:48pt;padding-bottom:3px;padding-top:3px;text-align:center;" width="64"| - |
||
| − | | class="xl24" style="border-top-style:none;border-left-style:none;width:48pt;padding-bottom:3px;padding-top:3px;text-align:center;" width="64" num="0.47"|47.00% |
||
| − | | class="xl24" style="border-top-style:none;border-left-style:none;width:48pt;padding-bottom:3px;padding-top:3px;text-align:center;" width="64" num="0.47"|47.00% |
||
| − | | class="xl24" style="border-top-style:none;border-left-style:none;width:48pt;padding-bottom:3px;padding-top:3px;text-align:center;" width="64" num="0.46"|46.00% |
||
| − | | class="xl24" style="border-top-style:none;border-left-style:none;width:48pt;padding-bottom:3px;padding-top:3px;text-align:center;" width="64" num="0.217"|21.70% |
||
| − | | class="xl24" style="border-top-style:none;border-left-style:none;width:48pt;padding-bottom:3px;padding-top:3px;text-align:center;" width="64" num="0.24"|24.00% |
||
| − | | class="xl24" style="border-top-style:none;border-left-style:none;width:48pt;padding-bottom:3px;padding-top:3px;text-align:center;" width="64" num="0.24"|24.00% |
||
| − | |- height="17" style="height:12.75pt" |
||
| − | | class="xl27" height="17" style="height:12.75pt;border-top-style:none;padding-bottom:3px;padding-top:3px;text-align:center;"|[[File:Skin.png|20px]] |
||
| − | | class="xl23" style="border-top-style:none;border-left-style:none;width:117pt;padding-bottom:3px;padding-top:3px;text-align:center;" width="156"|Chimera Great Wing |
||
| − | | class="xl23" style="border-top-style:none;border-left-style:none;width:48pt;padding-bottom:3px;padding-top:3px;text-align:center;" width="64"| - |
||
| − | | class="xl24" style="border-top-style:none;border-left-style:none;width:48pt;padding-bottom:3px;padding-top:3px;text-align:center;" width="64" num="0.15"|15.00% |
||
| − | | class="xl24" style="border-top-style:none;border-left-style:none;width:48pt;padding-bottom:3px;padding-top:3px;text-align:center;" width="64" num="0.15"|15.00% |
||
| − | | class="xl24" style="border-top-style:none;border-left-style:none;width:48pt;padding-bottom:3px;padding-top:3px;text-align:center;" width="64" num="0.15"|15.00% |
||
| − | | class="xl24" style="border-top-style:none;border-left-style:none;width:48pt;padding-bottom:3px;padding-top:3px;text-align:center;" width="64" num="0.13"|13.00% |
||
| − | | class="xl23" style="border-top-style:none;border-left-style:none;width:48pt;padding-bottom:3px;padding-top:3px;text-align:center;" width="64"| - |
||
| − | | class="xl23" style="border-top-style:none;border-left-style:none;width:48pt;padding-bottom:3px;padding-top:3px;text-align:center;" width="64"| - |
||
| − | |- height="17" style="height:12.75pt" |
||
| − | | class="xl27" height="17" style="height:12.75pt;border-top-style:none;padding-bottom:3px;padding-top:3px;text-align:center;"|[[File:Rock.png|20px]] |
||
| − | | class="xl23" style="border-top-style:none;border-left-style:none;width:117pt;padding-bottom:3px;padding-top:3px;text-align:center;" width="156"|Chimera Fang |
||
| − | | class="xl23" style="border-top-style:none;border-left-style:none;width:48pt;padding-bottom:3px;padding-top:3px;text-align:center;" width="64"| - |
||
| − | | class="xl24" style="border-top-style:none;border-left-style:none;width:48pt;padding-bottom:3px;padding-top:3px;text-align:center;" width="64" num="0.15"|15.00% |
||
| − | | class="xl24" style="border-top-style:none;border-left-style:none;width:48pt;padding-bottom:3px;padding-top:3px;text-align:center;" width="64" num="0.15"|15.00% |
||
| − | | class="xl24" style="border-top-style:none;border-left-style:none;width:48pt;padding-bottom:3px;padding-top:3px;text-align:center;" width="64" num="0.15"|15.00% |
||
| − | | class="xl23" style="border-top-style:none;border-left-style:none;width:48pt;padding-bottom:3px;padding-top:3px;text-align:center;" width="64"| - |
||
| − | | class="xl23" style="border-top-style:none;border-left-style:none;width:48pt;padding-bottom:3px;padding-top:3px;text-align:center;" width="64"| - |
||
| − | | class="xl23" style="border-top-style:none;border-left-style:none;width:48pt;padding-bottom:3px;padding-top:3px;text-align:center;" width="64"| - |
||
| − | |- height="17" style="height:12.75pt" |
||
| − | | class="xl27" height="17" style="height:12.75pt;border-top-style:none;padding-bottom:3px;padding-top:3px;text-align:center;"|[[File:Rock.png|20px]] |
||
| − | | class="xl23" style="border-top-style:none;border-left-style:none;width:117pt;padding-bottom:3px;padding-top:3px;text-align:center;" width="156"|Chimera Tusk |
||
| − | | class="xl23" style="border-top-style:none;border-left-style:none;width:48pt;padding-bottom:3px;padding-top:3px;text-align:center;" width="64"| - |
||
| − | | class="xl24" style="border-top-style:none;border-left-style:none;width:48pt;padding-bottom:3px;padding-top:3px;text-align:center;" width="64" num="0.15"|15.00% |
||
| − | | class="xl24" style="border-top-style:none;border-left-style:none;width:48pt;padding-bottom:3px;padding-top:3px;text-align:center;" width="64" num="0.15"|15.00% |
||
| − | | class="xl24" style="border-top-style:none;border-left-style:none;width:48pt;padding-bottom:3px;padding-top:3px;text-align:center;" width="64" num="0.15"|15.00% |
||
| − | | class="xl24" style="border-top-style:none;border-left-style:none;width:48pt;padding-bottom:3px;padding-top:3px;text-align:center;" width="64" num="0.27800000000000002"|27.80% |
||
| − | | class="xl23" style="border-top-style:none;border-left-style:none;width:48pt;padding-bottom:3px;padding-top:3px;text-align:center;" width="64"| - |
||
| − | | class="xl23" style="border-top-style:none;border-left-style:none;width:48pt;padding-bottom:3px;padding-top:3px;text-align:center;" width="64"| - |
||
| − | |- height="17" style="height:12.75pt" |
||
| − | | class="xl27" height="17" style="height:12.75pt;border-top-style:none;padding-bottom:3px;padding-top:3px;text-align:center;"|[[File:Rock.png|20px]] |
||
| − | | class="xl23" style="border-top-style:none;border-left-style:none;width:117pt;padding-bottom:3px;padding-top:3px;text-align:center;" width="156"|Chimera Femur |
||
| − | | class="xl23" style="border-top-style:none;border-left-style:none;width:48pt;padding-bottom:3px;padding-top:3px;text-align:center;" width="64"| - |
||
| − | | class="xl23" style="border-top-style:none;border-left-style:none;width:48pt;padding-bottom:3px;padding-top:3px;text-align:center;" width="64"| - |
||
| − | | class="xl23" style="border-top-style:none;border-left-style:none;width:48pt;padding-bottom:3px;padding-top:3px;text-align:center;" width="64"| - |
||
| − | | class="xl23" style="border-top-style:none;border-left-style:none;width:48pt;padding-bottom:3px;padding-top:3px;text-align:center;" width="64"| - |
||
| − | | class="xl24" style="border-top-style:none;border-left-style:none;width:48pt;padding-bottom:3px;padding-top:3px;text-align:center;" width="64" num="0.30399999999999999"|30.40% |
||
| − | | class="xl24" style="border-top-style:none;border-left-style:none;width:48pt;padding-bottom:3px;padding-top:3px;text-align:center;" width="64" num="0.32700000000000001"|32.70% |
||
| − | | class="xl24" style="border-top-style:none;border-left-style:none;width:48pt;padding-bottom:3px;padding-top:3px;text-align:center;" width="64" num="0.32700000000000001"|32.70% |
||
| − | |- height="17" style="height:12.75pt" |
||
| − | | class="xl27" height="17" style="height:12.75pt;border-top-style:none;padding-bottom:3px;padding-top:3px;text-align:center;"|[[File:Rock.png|20px]] |
||
| − | | class="xl23" style="border-top-style:none;border-left-style:none;width:117pt;padding-bottom:3px;padding-top:3px;text-align:center;" width="156"|Chimera Spark Claw |
||
| − | | class="xl23" style="border-top-style:none;border-left-style:none;width:48pt;padding-bottom:3px;padding-top:3px;text-align:center;" width="64"| - |
||
| − | | class="xl23" style="border-top-style:none;border-left-style:none;width:48pt;padding-bottom:3px;padding-top:3px;text-align:center;" width="64"| - |
||
| − | | class="xl23" style="border-top-style:none;border-left-style:none;width:48pt;padding-bottom:3px;padding-top:3px;text-align:center;" width="64"| - |
||
| − | | class="xl23" style="border-top-style:none;border-left-style:none;width:48pt;padding-bottom:3px;padding-top:3px;text-align:center;" width="64"| - |
||
| − | | class="xl24" style="border-top-style:none;border-left-style:none;width:48pt;padding-bottom:3px;padding-top:3px;text-align:center;" width="64" num="3.5000000000000003E-2"|3.50% |
||
| − | | class="xl24" style="border-top-style:none;border-left-style:none;width:48pt;padding-bottom:3px;padding-top:3px;text-align:center;" width="64" num="5.8000000000000003E-2"|5.80% |
||
| − | | class="xl24" style="border-top-style:none;border-left-style:none;width:48pt;padding-bottom:3px;padding-top:3px;text-align:center;" width="64" num="5.8000000000000003E-2"|5.80% |
||
| − | |- height="17" style="height:12.75pt" |
||
| − | | class="xl27" height="17" style="height:12.75pt;border-top-style:none;padding-bottom:3px;padding-top:3px;text-align:center;"|[[File:Beaker.png|20px]] |
||
| − | | class="xl23" style="border-top-style:none;border-left-style:none;width:117pt;padding-bottom:3px;padding-top:3px;text-align:center;" width="156"|Chimera Redstone |
||
| − | | class="xl23" style="border-top-style:none;border-left-style:none;width:48pt;padding-bottom:3px;padding-top:3px;text-align:center;" width="64"| - |
||
| − | | class="xl23" style="border-top-style:none;border-left-style:none;width:48pt;padding-bottom:3px;padding-top:3px;text-align:center;" width="64"| - |
||
| − | | class="xl23" style="border-top-style:none;border-left-style:none;width:48pt;padding-bottom:3px;padding-top:3px;text-align:center;" width="64"| - |
||
| − | | class="xl23" style="border-top-style:none;border-left-style:none;width:48pt;padding-bottom:3px;padding-top:3px;text-align:center;" width="64"| - |
||
| − | | class="xl24" style="border-top-style:none;border-left-style:none;width:48pt;padding-bottom:3px;padding-top:3px;text-align:center;" width="64" num="3.5000000000000003E-2"|3.50% |
||
| − | | class="xl24" style="border-top-style:none;border-left-style:none;width:48pt;padding-bottom:3px;padding-top:3px;text-align:center;" width="64" num="1.9E-2"|1.90% |
||
| − | | class="xl24" style="border-top-style:none;border-left-style:none;width:48pt;padding-bottom:3px;padding-top:3px;text-align:center;" width="64" num="1.9E-2"|1.90% |
||
| − | |- height="17" style="height:12.75pt" |
||
| − | | class="xl27" height="17" style="height:12.75pt;border-top-style:none;padding-bottom:3px;padding-top:3px;text-align:center;"|[[File:Skin.png|20px]] |
||
| − | | class="xl23" style="border-top-style:none;border-left-style:none;width:117pt;padding-bottom:3px;padding-top:3px;text-align:center;" width="156"|Chimera Spark Wing |
||
| − | | class="xl23" style="border-top-style:none;border-left-style:none;width:48pt;padding-bottom:3px;padding-top:3px;text-align:center;" width="64"| - |
||
| − | | class="xl23" style="border-top-style:none;border-left-style:none;width:48pt;padding-bottom:3px;padding-top:3px;text-align:center;" width="64"| - |
||
| − | | class="xl23" style="border-top-style:none;border-left-style:none;width:48pt;padding-bottom:3px;padding-top:3px;text-align:center;" width="64"| - |
||
| − | | class="xl23" style="border-top-style:none;border-left-style:none;width:48pt;padding-bottom:3px;padding-top:3px;text-align:center;" width="64"| - |
||
| − | | class="xl23" style="border-top-style:none;border-left-style:none;width:48pt;padding-bottom:3px;padding-top:3px;text-align:center;" width="64"| - |
||
| − | | class="xl24" style="border-top-style:none;border-left-style:none;width:48pt;padding-bottom:3px;padding-top:3px;text-align:center;" width="64" num="0.24"|24.00% |
||
| − | | class="xl24" style="border-top-style:none;border-left-style:none;width:48pt;padding-bottom:3px;padding-top:3px;text-align:center;" width="64" num="0.24"|24.00% |
||
| − | |- height="17" style="height:12.75pt" |
||
| − | | class="xl27" height="17" style="height:12.75pt;border-top-style:none;padding-bottom:3px;padding-top:3px;text-align:center;"|[[File:Beaker.png|20px]] |
||
| − | | class="xl23" style="border-top-style:none;border-left-style:none;width:117pt;padding-bottom:3px;padding-top:3px;text-align:center;" width="156"|Volt Generator |
||
| − | | class="xl23" style="border-top-style:none;border-left-style:none;width:48pt;padding-bottom:3px;padding-top:3px;text-align:center;" width="64"| - |
||
| − | | class="xl23" style="border-top-style:none;border-left-style:none;width:48pt;padding-bottom:3px;padding-top:3px;text-align:center;" width="64"| - |
||
| − | | class="xl23" style="border-top-style:none;border-left-style:none;width:48pt;padding-bottom:3px;padding-top:3px;text-align:center;" width="64"| - |
||
| − | | class="xl23" style="border-top-style:none;border-left-style:none;width:48pt;padding-bottom:3px;padding-top:3px;text-align:center;" width="64"| - |
||
| − | | class="xl23" style="border-top-style:none;border-left-style:none;width:48pt;padding-bottom:3px;padding-top:3px;text-align:center;" width="64"| - |
||
| − | | class="xl24" style="border-top-style:none;border-left-style:none;width:48pt;padding-bottom:3px;padding-top:3px;text-align:center;" width="64" num="6.7000000000000004E-2"|6.70% |
||
| − | | class="xl24" style="border-top-style:none;border-left-style:none;width:48pt;padding-bottom:3px;padding-top:3px;text-align:center;" width="64" num="6.7000000000000004E-2"|6.70% |
||
| − | |- height="17" style="height:12.75pt" |
||
| − | | class="xl27" height="17" style="height:12.75pt;border-top-style:none;padding-bottom:3px;padding-top:3px;text-align:center;"|[[File:Beaker.png|20px]] |
||
| − | | class="xl23" style="border-top-style:none;border-left-style:none;width:117pt;padding-bottom:3px;padding-top:3px;text-align:center;" width="156"|High Conductor |
||
| − | | class="xl23" style="border-top-style:none;border-left-style:none;width:48pt;padding-bottom:3px;padding-top:3px;text-align:center;" width="64"| - |
||
| − | | class="xl23" style="border-top-style:none;border-left-style:none;width:48pt;padding-bottom:3px;padding-top:3px;text-align:center;" width="64"| - |
||
| − | | class="xl23" style="border-top-style:none;border-left-style:none;width:48pt;padding-bottom:3px;padding-top:3px;text-align:center;" width="64"| - |
||
| − | | class="xl23" style="border-top-style:none;border-left-style:none;width:48pt;padding-bottom:3px;padding-top:3px;text-align:center;" width="64"| - |
||
| − | | class="xl23" style="border-top-style:none;border-left-style:none;width:48pt;padding-bottom:3px;padding-top:3px;text-align:center;" width="64"| - |
||
| − | | class="xl24" style="border-top-style:none;border-left-style:none;width:48pt;padding-bottom:3px;padding-top:3px;text-align:center;" width="64" num="4.8000000000000001E-2"|4.80% |
||
| − | | class="xl24" style="border-top-style:none;border-left-style:none;width:48pt;padding-bottom:3px;padding-top:3px;text-align:center;" width="64" num="4.8000000000000001E-2"|4.80% |
||
|} |
|} |
||
| − | |-| |
||
| − | Unbound Bonus Rates= |
||
| − | {| border="0" cellpadding="0" cellspacing="0" style="border-collapse: collapse;width:100%" width="100%" str="" class="wikitable" |
||
| − | |- height="17" style="height:12.75pt" |
||
| − | | class="xl28" height="34" rowspan="2" style="height:25.5pt;width:52pt;text-align:center;" width="69"|'''Part''' |
||
| − | | class="xl28" rowspan="2" style="width:20pt;text-align:center;" width="27"|'''Pic''' |
||
| − | | class="xl28" rowspan="2" style="width:130pt;text-align:center;" width="141"|'''Material Name''' |
||
| − | | class="xl24" colspan="7" style="border-left-style:none;width:336pt;text-align:center;" width="448"|'''Bonus Rates per Difficulty''' |
||
| − | |- height="17" style="height:12.75pt" |
||
| − | | class="xl24" height="17" style="height:12.75pt;border-top-style:none;border-left-style:none;width:48pt;padding-bottom:3px;padding-top:3px;text-align:center;" width="64" num=""|'''3''' |
||
| − | | class="xl24" style="border-top-style:none;border-left-style:none;width:48pt;padding-bottom:3px;padding-top:3px;text-align:center;" width="64" num=""|'''4''' |
||
| − | | class="xl24" style="border-top-style:none;border-left-style:none;width:48pt;padding-bottom:3px;padding-top:3px;text-align:center;" width="64" num=""|'''5''' |
||
| − | | class="xl24" style="border-top-style:none;border-left-style:none;width:48pt;padding-bottom:3px;padding-top:3px;text-align:center;" width="64" num=""|'''6''' |
||
| − | | class="xl24" style="border-top-style:none;border-left-style:none;width:48pt;padding-bottom:3px;padding-top:3px;text-align:center;" width="64" num=""|'''8''' |
||
| − | | class="xl24" style="border-top-style:none;border-left-style:none;width:48pt;padding-bottom:3px;padding-top:3px;text-align:center;" width="64" num=""|'''9''' |
||
| − | | class="xl24" style="border-top-style:none;border-left-style:none;width:48pt;padding-bottom:3px;padding-top:3px;text-align:center;" width="64"|'''CH''' |
||
| − | |- height="17" style="height:12.75pt" |
||
| − | | class="xl29" height="119" rowspan="7" style="height:89.25pt;border-top-style:none;width:52pt;padding-bottom:3px;padding-top:3px;text-align:center;" width="69"|Front Legs |
||
| − | | class="xl27" style="border-top-style:none;border-left-style:none;text-align:center;"|[[File:Skin.png|20px]] |
||
| − | | class="xl25" style="border-top-style:none;border-left-style:none;width:106pt;padding-bottom:3px;padding-top:3px;text-align:center;" width="141"|Chimera Fur |
||
| − | | class="xl26" style="border-top-style:none;border-left-style:none;width:48pt;padding-bottom:3px;padding-top:3px;text-align:center;" width="64" num="0.8"|80.00% |
||
| − | | class="xl25" style="border-top-style:none;border-left-style:none;width:48pt;padding-bottom:3px;padding-top:3px;text-align:center;" width="64"| - |
||
| − | | class="xl25" style="border-top-style:none;border-left-style:none;width:48pt;padding-bottom:3px;padding-top:3px;text-align:center;" width="64"| - |
||
| − | | class="xl25" style="border-top-style:none;border-left-style:none;width:48pt;padding-bottom:3px;padding-top:3px;text-align:center;" width="64"| - |
||
| − | | class="xl25" style="border-top-style:none;border-left-style:none;width:48pt;padding-bottom:3px;padding-top:3px;text-align:center;" width="64"| - |
||
| − | | class="xl25" style="border-top-style:none;border-left-style:none;width:48pt;padding-bottom:3px;padding-top:3px;text-align:center;" width="64"| - |
||
| − | | class="xl25" style="border-top-style:none;border-left-style:none;width:48pt;padding-bottom:3px;padding-top:3px;text-align:center;" width="64"| - |
||
| − | |- height="17" style="height:12.75pt" |
||
| − | | class="xl27" height="17" style="height:12.75pt;border-top-style:none;border-left-style:none;text-align:center;"|[[File:Rock.png|20px]] |
||
| − | | class="xl25" style="border-top-style:none;border-left-style:none;width:106pt;padding-bottom:3px;padding-top:3px;text-align:center;" width="141"|Chimera Claw |
||
| − | | class="xl26" style="border-top-style:none;border-left-style:none;width:48pt;padding-bottom:3px;padding-top:3px;text-align:center;" width="64" num="0.2"|20.00% |
||
| − | | class="xl26" style="border-top-style:none;border-left-style:none;width:48pt;padding-bottom:3px;padding-top:3px;text-align:center;" width="64" num="0.1"|10.00% |
||
| − | | class="xl26" style="border-top-style:none;border-left-style:none;width:48pt;padding-bottom:3px;padding-top:3px;text-align:center;" width="64" num="0.1"|10.00% |
||
| − | | class="xl26" style="border-top-style:none;border-left-style:none;width:48pt;padding-bottom:3px;padding-top:3px;text-align:center;" width="64" num="0.25"|25.00% |
||
| − | | class="xl25" style="border-top-style:none;border-left-style:none;width:48pt;padding-bottom:3px;padding-top:3px;text-align:center;" width="64"| - |
||
| − | | class="xl25" style="border-top-style:none;border-left-style:none;width:48pt;padding-bottom:3px;padding-top:3px;text-align:center;" width="64"| - |
||
| − | | class="xl25" style="border-top-style:none;border-left-style:none;width:48pt;padding-bottom:3px;padding-top:3px;text-align:center;" width="64"| - |
||
| − | |- height="17" style="height:12.75pt" |
||
| − | | class="xl27" height="17" style="height:12.75pt;border-top-style:none;border-left-style:none;text-align:center;"|[[File:Skin.png|20px]] |
||
| − | | class="xl25" style="border-top-style:none;border-left-style:none;width:106pt;padding-bottom:3px;padding-top:3px;text-align:center;" width="141"|Chimera Spark Fur |
||
| − | | class="xl25" style="border-top-style:none;border-left-style:none;width:48pt;padding-bottom:3px;padding-top:3px;text-align:center;" width="64"| - |
||
| − | | class="xl26" style="border-top-style:none;border-left-style:none;width:48pt;padding-bottom:3px;padding-top:3px;text-align:center;" width="64" num="0.9"|90.00% |
||
| − | | class="xl26" style="border-top-style:none;border-left-style:none;width:48pt;padding-bottom:3px;padding-top:3px;text-align:center;" width="64" num="0.9"|90.00% |
||
| − | | class="xl26" style="border-top-style:none;border-left-style:none;width:48pt;padding-bottom:3px;padding-top:3px;text-align:center;" width="64" num="0.75"|75.00% |
||
| − | | class="xl25" style="border-top-style:none;border-left-style:none;width:48pt;padding-bottom:3px;padding-top:3px;text-align:center;" width="64"| - |
||
| − | | class="xl25" style="border-top-style:none;border-left-style:none;width:48pt;padding-bottom:3px;padding-top:3px;text-align:center;" width="64"| - |
||
| − | | class="xl25" style="border-top-style:none;border-left-style:none;width:48pt;padding-bottom:3px;padding-top:3px;text-align:center;" width="64"| - |
||
| − | |- height="17" style="height:12.75pt" |
||
| − | | class="xl27" height="17" style="height:12.75pt;border-top-style:none;border-left-style:none;text-align:center;"|[[File:Rock.png|20px]] |
||
| − | | class="xl25" style="border-top-style:none;border-left-style:none;width:106pt;padding-bottom:3px;padding-top:3px;text-align:center;" width="141"|Chimera Femur |
||
| − | | class="xl25" style="border-top-style:none;border-left-style:none;width:48pt;padding-bottom:3px;padding-top:3px;text-align:center;" width="64"| - |
||
| − | | class="xl25" style="border-top-style:none;border-left-style:none;width:48pt;padding-bottom:3px;padding-top:3px;text-align:center;" width="64"| - |
||
| − | | class="xl25" style="border-top-style:none;border-left-style:none;width:48pt;padding-bottom:3px;padding-top:3px;text-align:center;" width="64"| - |
||
| − | | class="xl25" style="border-top-style:none;border-left-style:none;width:48pt;padding-bottom:3px;padding-top:3px;text-align:center;" width="64"| - |
||
| − | | class="xl26" style="border-top-style:none;border-left-style:none;width:48pt;padding-bottom:3px;padding-top:3px;text-align:center;" width="64" num="0.84"|84.00% |
||
| − | | class="xl26" style="border-top-style:none;border-left-style:none;width:48pt;padding-bottom:3px;padding-top:3px;text-align:center;" width="64" num="0.83"|83.00% |
||
| − | | class="xl26" style="border-top-style:none;border-left-style:none;width:48pt;padding-bottom:3px;padding-top:3px;text-align:center;" width="64" num="0.81"|81.00% |
||
| − | |- height="17" style="height:12.75pt" |
||
| − | | class="xl27" height="17" style="height:12.75pt;border-top-style:none;border-left-style:none;text-align:center;"|[[File:Rock.png|20px]] |
||
| − | | class="xl25" style="border-top-style:none;border-left-style:none;width:106pt;padding-bottom:3px;padding-top:3px;text-align:center;" width="141"|Chimera Spark Claw |
||
| − | | class="xl25" style="border-top-style:none;border-left-style:none;width:48pt;padding-bottom:3px;padding-top:3px;text-align:center;" width="64"| - |
||
| − | | class="xl25" style="border-top-style:none;border-left-style:none;width:48pt;padding-bottom:3px;padding-top:3px;text-align:center;" width="64"| - |
||
| − | | class="xl25" style="border-top-style:none;border-left-style:none;width:48pt;padding-bottom:3px;padding-top:3px;text-align:center;" width="64"| - |
||
| − | | class="xl25" style="border-top-style:none;border-left-style:none;width:48pt;padding-bottom:3px;padding-top:3px;text-align:center;" width="64"| - |
||
| − | | class="xl26" style="border-top-style:none;border-left-style:none;width:48pt;padding-bottom:3px;padding-top:3px;text-align:center;" width="64" num="0.1"|10.00% |
||
| − | | class="xl26" style="border-top-style:none;border-left-style:none;width:48pt;padding-bottom:3px;padding-top:3px;text-align:center;" width="64" num="0.1"|10.00% |
||
| − | | class="xl26" style="border-top-style:none;border-left-style:none;width:48pt;padding-bottom:3px;padding-top:3px;text-align:center;" width="64" num="0.1"|10.00% |
||
| − | |- height="17" style="height:12.75pt" |
||
| − | | class="xl27" height="17" style="height:12.75pt;border-top-style:none;border-left-style:none;text-align:center;"|[[File:Beaker.png|20px]] |
||
| − | | class="xl25" style="border-top-style:none;border-left-style:none;width:106pt;padding-bottom:3px;padding-top:3px;text-align:center;" width="141"|Volt Generator |
||
| − | | class="xl25" style="border-top-style:none;border-left-style:none;width:48pt;padding-bottom:3px;padding-top:3px;text-align:center;" width="64"| - |
||
| − | | class="xl25" style="border-top-style:none;border-left-style:none;width:48pt;padding-bottom:3px;padding-top:3px;text-align:center;" width="64"| - |
||
| − | | class="xl25" style="border-top-style:none;border-left-style:none;width:48pt;padding-bottom:3px;padding-top:3px;text-align:center;" width="64"| - |
||
| − | | class="xl25" style="border-top-style:none;border-left-style:none;width:48pt;padding-bottom:3px;padding-top:3px;text-align:center;" width="64"| - |
||
| − | | class="xl26" style="border-top-style:none;border-left-style:none;width:48pt;padding-bottom:3px;padding-top:3px;text-align:center;" width="64" num="0.06"|6.00% |
||
| − | | class="xl25" style="border-top-style:none;border-left-style:none;width:48pt;padding-bottom:3px;padding-top:3px;text-align:center;" width="64"| - |
||
| − | | class="xl25" style="border-top-style:none;border-left-style:none;width:48pt;padding-bottom:3px;padding-top:3px;text-align:center;" width="64"| - |
||
| − | |- height="17" style="height:12.75pt" |
||
| − | | class="xl27" height="17" style="height:12.75pt;border-top-style:none;border-left-style:none;text-align:center;"|[[File:Beaker.png|20px]] |
||
| − | | class="xl25" style="border-top-style:none;border-left-style:none;width:106pt;padding-bottom:3px;padding-top:3px;text-align:center;" width="141"|High Conductor |
||
| − | | class="xl25" style="border-top-style:none;border-left-style:none;width:48pt;padding-bottom:3px;padding-top:3px;text-align:center;" width="64"| - |
||
| − | | class="xl25" style="border-top-style:none;border-left-style:none;width:48pt;padding-bottom:3px;padding-top:3px;text-align:center;" width="64"| - |
||
| − | | class="xl25" style="border-top-style:none;border-left-style:none;width:48pt;padding-bottom:3px;padding-top:3px;text-align:center;" width="64"| - |
||
| − | | class="xl25" style="border-top-style:none;border-left-style:none;width:48pt;padding-bottom:3px;padding-top:3px;text-align:center;" width="64"| - |
||
| − | | class="xl25" style="border-top-style:none;border-left-style:none;width:48pt;padding-bottom:3px;padding-top:3px;text-align:center;" width="64"| - |
||
| − | | class="xl26" style="border-top-style:none;border-left-style:none;width:48pt;padding-bottom:3px;padding-top:3px;text-align:center;" width="64" num="0.07"|7.00% |
||
| − | | class="xl26" style="border-top-style:none;border-left-style:none;width:48pt;padding-bottom:3px;padding-top:3px;text-align:center;" width="64" num="0.09"|9.00% |
||
| − | |- height="17" style="height:12.75pt" |
||
| − | | class="xl29" height="119" rowspan="7" style="height:89.25pt;border-top-style:none;width:52pt;padding-bottom:3px;padding-top:3px;text-align:center;" width="69"|Head |
||
| − | | class="xl27" style="border-top-style:none;border-left-style:none;text-align:center;"|[[File:Rock.png|20px]] |
||
| − | | class="xl25" style="border-top-style:none;border-left-style:none;width:106pt;padding-bottom:3px;padding-top:3px;text-align:center;" width="141"|Chimera Fang |
||
| − | | class="xl26" style="border-top-style:none;border-left-style:none;width:48pt;padding-bottom:3px;padding-top:3px;text-align:center;" width="64" num="0.56899999999999995"|56.90% |
||
| − | | class="xl26" style="border-top-style:none;border-left-style:none;width:48pt;padding-bottom:3px;padding-top:3px;text-align:center;" width="64" num="0.25"|25.00% |
||
| − | | class="xl26" style="border-top-style:none;border-left-style:none;width:48pt;padding-bottom:3px;padding-top:3px;text-align:center;" width="64" num="0.25"|25.00% |
||
| − | | class="xl26" style="border-top-style:none;border-left-style:none;width:48pt;padding-bottom:3px;padding-top:3px;text-align:center;" width="64" num="0.25"|25.00% |
||
| − | | class="xl25" style="border-top-style:none;border-left-style:none;width:48pt;padding-bottom:3px;padding-top:3px;text-align:center;" width="64"| - |
||
| − | | class="xl25" style="border-top-style:none;border-left-style:none;width:48pt;padding-bottom:3px;padding-top:3px;text-align:center;" width="64"| - |
||
| − | | class="xl25" style="border-top-style:none;border-left-style:none;width:48pt;padding-bottom:3px;padding-top:3px;text-align:center;" width="64"| - |
||
| − | |- height="17" style="height:12.75pt" |
||
| − | | class="xl27" height="17" style="height:12.75pt;border-top-style:none;border-left-style:none;text-align:center;"|[[File:Rock.png|20px]] |
||
| − | | class="xl25" style="border-top-style:none;border-left-style:none;width:106pt;padding-bottom:3px;padding-top:3px;text-align:center;" width="141"|Chimera Skull |
||
| − | | class="xl26" style="border-top-style:none;border-left-style:none;width:48pt;padding-bottom:3px;padding-top:3px;text-align:center;" width="64" num="0.43099999999999999"|43.10% |
||
| − | | class="xl25" style="border-top-style:none;border-left-style:none;width:48pt;padding-bottom:3px;padding-top:3px;text-align:center;" width="64"| - |
||
| − | | class="xl25" style="border-top-style:none;border-left-style:none;width:48pt;padding-bottom:3px;padding-top:3px;text-align:center;" width="64"| - |
||
| − | | class="xl25" style="border-top-style:none;border-left-style:none;width:48pt;padding-bottom:3px;padding-top:3px;text-align:center;" width="64"| - |
||
| − | | class="xl25" style="border-top-style:none;border-left-style:none;width:48pt;padding-bottom:3px;padding-top:3px;text-align:center;" width="64"| - |
||
| − | | class="xl25" style="border-top-style:none;border-left-style:none;width:48pt;padding-bottom:3px;padding-top:3px;text-align:center;" width="64"| - |
||
| − | | class="xl25" style="border-top-style:none;border-left-style:none;width:48pt;padding-bottom:3px;padding-top:3px;text-align:center;" width="64"| - |
||
| − | |- height="17" style="height:12.75pt" |
||
| − | | class="xl27" height="17" style="height:12.75pt;border-top-style:none;border-left-style:none;text-align:center;"|[[File:Rock.png|20px]] |
||
| − | | class="xl25" style="border-top-style:none;border-left-style:none;width:106pt;padding-bottom:3px;padding-top:3px;text-align:center;" width="141"|Chimera Tusk |
||
| − | | class="xl25" style="border-top-style:none;border-left-style:none;width:48pt;padding-bottom:3px;padding-top:3px;text-align:center;" width="64"| - |
||
| − | | class="xl26" style="border-top-style:none;border-left-style:none;width:48pt;padding-bottom:3px;padding-top:3px;text-align:center;" width="64" num="0.6"|60.00% |
||
| − | | class="xl26" style="border-top-style:none;border-left-style:none;width:48pt;padding-bottom:3px;padding-top:3px;text-align:center;" width="64" num="0.5"|50.00% |
||
| − | | class="xl26" style="border-top-style:none;border-left-style:none;width:48pt;padding-bottom:3px;padding-top:3px;text-align:center;" width="64" num="0.4"|40.00% |
||
| − | | class="xl26" style="border-top-style:none;border-left-style:none;width:48pt;padding-bottom:3px;padding-top:3px;text-align:center;" width="64" num="0.5"|50.00% |
||
| − | | class="xl25" style="border-top-style:none;border-left-style:none;width:48pt;padding-bottom:3px;padding-top:3px;text-align:center;" width="64"| - |
||
| − | | class="xl25" style="border-top-style:none;border-left-style:none;width:48pt;padding-bottom:3px;padding-top:3px;text-align:center;" width="64"| - |
||
| − | |- height="17" style="height:12.75pt" |
||
| − | | class="xl27" height="17" style="height:12.75pt;border-top-style:none;border-left-style:none;text-align:center;"|[[File:Rock.png|20px]] |
||
| − | | class="xl25" style="border-top-style:none;border-left-style:none;width:106pt;padding-bottom:3px;padding-top:3px;text-align:center;" width="141"|Chimera Spark Skull |
||
| − | | class="xl25" style="border-top-style:none;border-left-style:none;width:48pt;padding-bottom:3px;padding-top:3px;text-align:center;" width="64"| - |
||
| − | | class="xl26" style="border-top-style:none;border-left-style:none;width:48pt;padding-bottom:3px;padding-top:3px;text-align:center;" width="64" num="0.15"|15.00% |
||
| − | | class="xl26" style="border-top-style:none;border-left-style:none;width:48pt;padding-bottom:3px;padding-top:3px;text-align:center;" width="64" num="0.25"|25.00% |
||
| − | | class="xl26" style="border-top-style:none;border-left-style:none;width:48pt;padding-bottom:3px;padding-top:3px;text-align:center;" width="64" num="0.35"|35.00% |
||
| − | | class="xl26" style="border-top-style:none;border-left-style:none;width:48pt;padding-bottom:3px;padding-top:3px;text-align:center;" width="64" num="0.5"|50.00% |
||
| − | | class="xl26" style="border-top-style:none;border-left-style:none;width:48pt;padding-bottom:3px;padding-top:3px;text-align:center;" width="64" num="0.79"|79.00% |
||
| − | | class="xl26" style="border-top-style:none;border-left-style:none;width:48pt;padding-bottom:3px;padding-top:3px;text-align:center;" width="64" num="0.76"|76.00% |
||
| − | |- height="17" style="height:12.75pt" |
||
| − | | class="xl27" height="17" style="height:12.75pt;border-top-style:none;border-left-style:none;text-align:center;"|[[File:Rock.png|20px]] |
||
| − | | class="xl25" style="border-top-style:none;border-left-style:none;width:106pt;padding-bottom:3px;padding-top:3px;text-align:center;" width="141"|Chimera Spark Fang |
||
| − | | class="xl25" style="border-top-style:none;border-left-style:none;width:48pt;padding-bottom:3px;padding-top:3px;text-align:center;" width="64"| - |
||
| − | | class="xl25" style="border-top-style:none;border-left-style:none;width:48pt;padding-bottom:3px;padding-top:3px;text-align:center;" width="64"| - |
||
| − | | class="xl25" style="border-top-style:none;border-left-style:none;width:48pt;padding-bottom:3px;padding-top:3px;text-align:center;" width="64"| - |
||
| − | | class="xl25" style="border-top-style:none;border-left-style:none;width:48pt;padding-bottom:3px;padding-top:3px;text-align:center;" width="64"| - |
||
| − | | class="xl25" style="border-top-style:none;border-left-style:none;width:48pt;padding-bottom:3px;padding-top:3px;text-align:center;" width="64"| - |
||
| − | | class="xl26" style="border-top-style:none;border-left-style:none;width:48pt;padding-bottom:3px;padding-top:3px;text-align:center;" width="64" num="0.15"|15.00% |
||
| − | | class="xl26" style="border-top-style:none;border-left-style:none;width:48pt;padding-bottom:3px;padding-top:3px;text-align:center;" width="64" num="0.15"|15.00% |
||
| − | |- height="17" style="height:12.75pt" |
||
| − | | class="xl27" height="17" style="height:12.75pt;border-top-style:none;border-left-style:none;text-align:center;"|[[File:Beaker.png|20px]] |
||
| − | | class="xl25" style="border-top-style:none;border-left-style:none;width:106pt;padding-bottom:3px;padding-top:3px;text-align:center;" width="141"|Chimera Redstone |
||
| − | | class="xl25" style="border-top-style:none;border-left-style:none;width:48pt;padding-bottom:3px;padding-top:3px;text-align:center;" width="64"| - |
||
| − | | class="xl25" style="border-top-style:none;border-left-style:none;width:48pt;padding-bottom:3px;padding-top:3px;text-align:center;" width="64"| - |
||
| − | | class="xl25" style="border-top-style:none;border-left-style:none;width:48pt;padding-bottom:3px;padding-top:3px;text-align:center;" width="64"| - |
||
| − | | class="xl25" style="border-top-style:none;border-left-style:none;width:48pt;padding-bottom:3px;padding-top:3px;text-align:center;" width="64"| - |
||
| − | | class="xl25" style="border-top-style:none;border-left-style:none;width:48pt;padding-bottom:3px;padding-top:3px;text-align:center;" width="64"| - |
||
| − | | class="xl26" style="border-top-style:none;border-left-style:none;width:48pt;padding-bottom:3px;padding-top:3px;text-align:center;" width="64" num="0.06"|6.00% |
||
| − | | class="xl26" style="border-top-style:none;border-left-style:none;width:48pt;padding-bottom:3px;padding-top:3px;text-align:center;" width="64" num="0.09"|9.00% |
||
| − | |- height="17" style="height:12.75pt" |
||
| − | | class="xl27" height="17" style="height:12.75pt;border-top-style:none;border-left-style:none;text-align:center;"|[[File:Skin.png|20px]] |
||
| − | | class="xl25" style="border-top-style:none;border-left-style:none;width:106pt;padding-bottom:3px;padding-top:3px;text-align:center;" width="141"|Chimera Fur |
||
| − | | class="xl26" style="border-top-style:none;border-left-style:none;width:48pt;padding-bottom:3px;padding-top:3px;text-align:center;" width="64" num="0.8"|80.00% |
||
| − | | class="xl26" style="border-top-style:none;border-left-style:none;width:48pt;padding-bottom:3px;padding-top:3px;text-align:center;" width="64" num="0.2"|20.00% |
||
| − | | class="xl26" style="border-top-style:none;border-left-style:none;width:48pt;padding-bottom:3px;padding-top:3px;text-align:center;" width="64" num="0.29"|29.00% |
||
| − | | class="xl26" style="border-top-style:none;border-left-style:none;width:48pt;padding-bottom:3px;padding-top:3px;text-align:center;" width="64" num="0.18"|18.00% |
||
| − | | class="xl25" style="border-top-style:none;border-left-style:none;width:48pt;padding-bottom:3px;padding-top:3px;text-align:center;" width="64"| - |
||
| − | | class="xl25" style="border-top-style:none;border-left-style:none;width:48pt;padding-bottom:3px;padding-top:3px;text-align:center;" width="64"| - |
||
| − | | class="xl25" style="border-top-style:none;border-left-style:none;width:48pt;padding-bottom:3px;padding-top:3px;text-align:center;" width="64"| - |
||
| − | |- height="17" style="height:12.75pt" |
||
| − | | class="xl29" height="136" rowspan="8" style="height:102pt;border-top-style:none;width:52pt;padding-bottom:3px;padding-top:3px;text-align:center;" width="69"|Tail |
||
| − | | class="xl27" style="border-top-style:none;border-left-style:none;text-align:center;"|[[File:Beaker.png|20px]] |
||
| − | | class="xl25" style="border-top-style:none;border-left-style:none;width:106pt;padding-bottom:3px;padding-top:3px;text-align:center;" width="141"|Generator |
||
| − | | class="xl26" style="border-top-style:none;border-left-style:none;width:48pt;padding-bottom:3px;padding-top:3px;text-align:center;" width="64" num="0.2"|20.00% |
||
| − | | class="xl26" style="border-top-style:none;border-left-style:none;width:48pt;padding-bottom:3px;padding-top:3px;text-align:center;" width="64" num="0.1"|10.00% |
||
| − | | class="xl26" style="border-top-style:none;border-left-style:none;width:48pt;padding-bottom:3px;padding-top:3px;text-align:center;" width="64" num="0.1"|10.00% |
||
| − | | class="xl26" style="border-top-style:none;border-left-style:none;width:48pt;padding-bottom:3px;padding-top:3px;text-align:center;" width="64" num="0.1"|10.00% |
||
| − | | class="xl25" style="border-top-style:none;border-left-style:none;width:48pt;padding-bottom:3px;padding-top:3px;text-align:center;" width="64"| - |
||
| − | | class="xl25" style="border-top-style:none;border-left-style:none;width:48pt;padding-bottom:3px;padding-top:3px;text-align:center;" width="64"| - |
||
| − | | class="xl25" style="border-top-style:none;border-left-style:none;width:48pt;padding-bottom:3px;padding-top:3px;text-align:center;" width="64"| - |
||
| − | |- height="17" style="height:12.75pt" |
||
| − | | class="xl27" height="17" style="height:12.75pt;border-top-style:none;border-left-style:none;text-align:center;"|[[File:Skin.png|20px]] |
||
| − | | class="xl25" style="border-top-style:none;border-left-style:none;width:106pt;padding-bottom:3px;padding-top:3px;text-align:center;" width="141"|Chimera Spark Fur |
||
| − | | class="xl25" style="border-top-style:none;border-left-style:none;width:48pt;padding-bottom:3px;padding-top:3px;text-align:center;" width="64"| - |
||
| − | | class="xl26" style="border-top-style:none;border-left-style:none;width:48pt;padding-bottom:3px;padding-top:3px;text-align:center;" width="64" num="0.6"|60.00% |
||
| − | | class="xl26" style="border-top-style:none;border-left-style:none;width:48pt;padding-bottom:3px;padding-top:3px;text-align:center;" width="64" num="0.5"|50.00% |
||
| − | | class="xl26" style="border-top-style:none;border-left-style:none;width:48pt;padding-bottom:3px;padding-top:3px;text-align:center;" width="64" num="0.6"|60.00% |
||
| − | | class="xl26" style="border-top-style:none;border-left-style:none;width:48pt;padding-bottom:3px;padding-top:3px;text-align:center;" width="64" num="0.45"|45.00% |
||
| − | | class="xl26" style="border-top-style:none;border-left-style:none;width:48pt;padding-bottom:3px;padding-top:3px;text-align:center;" width="64" num="0.38"|38.00% |
||
| − | | class="xl26" style="border-top-style:none;border-left-style:none;width:48pt;padding-bottom:3px;padding-top:3px;text-align:center;" width="64" num="0.38"|38.00% |
||
| − | |- height="17" style="height:12.75pt" |
||
| − | | class="xl27" height="17" style="height:12.75pt;border-top-style:none;border-left-style:none;text-align:center;"|[[File:Beaker.png|20px]] |
||
| − | | class="xl25" style="border-top-style:none;border-left-style:none;width:106pt;padding-bottom:3px;padding-top:3px;text-align:center;" width="141"|Conductor |
||
| − | | class="xl25" style="border-top-style:none;border-left-style:none;width:48pt;padding-bottom:3px;padding-top:3px;text-align:center;" width="64"| - |
||
| − | | class="xl26" style="border-top-style:none;border-left-style:none;width:48pt;padding-bottom:3px;padding-top:3px;text-align:center;" width="64" num="0.1"|10.00% |
||
| − | | class="xl26" style="border-top-style:none;border-left-style:none;width:48pt;padding-bottom:3px;padding-top:3px;text-align:center;" width="64" num="0.11"|11.00% |
||
| − | | class="xl26" style="border-top-style:none;border-left-style:none;width:48pt;padding-bottom:3px;padding-top:3px;text-align:center;" width="64" num="0.12"|12.00% |
||
| − | | class="xl25" style="border-top-style:none;border-left-style:none;width:48pt;padding-bottom:3px;padding-top:3px;text-align:center;" width="64"| - |
||
| − | | class="xl25" style="border-top-style:none;border-left-style:none;width:48pt;padding-bottom:3px;padding-top:3px;text-align:center;" width="64"| - |
||
| − | | class="xl25" style="border-top-style:none;border-left-style:none;width:48pt;padding-bottom:3px;padding-top:3px;text-align:center;" width="64"| - |
||
| − | |- height="17" style="height:12.75pt" |
||
| − | | class="xl27" height="17" style="height:12.75pt;border-top-style:none;border-left-style:none;text-align:center;"|[[File:Skin.png|20px]] |
||
| − | | class="xl25" style="border-top-style:none;border-left-style:none;width:106pt;padding-bottom:3px;padding-top:3px;text-align:center;" width="141"|Chimera Great Wing |
||
| − | | class="xl25" style="border-top-style:none;border-left-style:none;width:48pt;padding-bottom:3px;padding-top:3px;text-align:center;" width="64"| - |
||
| − | | class="xl25" style="border-top-style:none;border-left-style:none;width:48pt;padding-bottom:3px;padding-top:3px;text-align:center;" width="64"| - |
||
| − | | class="xl25" style="border-top-style:none;border-left-style:none;width:48pt;padding-bottom:3px;padding-top:3px;text-align:center;" width="64"| - |
||
| − | | class="xl25" style="border-top-style:none;border-left-style:none;width:48pt;padding-bottom:3px;padding-top:3px;text-align:center;" width="64"| - |
||
| − | | class="xl26" style="border-top-style:none;border-left-style:none;width:48pt;padding-bottom:3px;padding-top:3px;text-align:center;" width="64" num="0.4"|40.00% |
||
| − | | class="xl25" style="border-top-style:none;border-left-style:none;width:48pt;padding-bottom:3px;padding-top:3px;text-align:center;" width="64"| - |
||
| − | | class="xl25" style="border-top-style:none;border-left-style:none;width:48pt;padding-bottom:3px;padding-top:3px;text-align:center;" width="64"| - |
||
| − | |- height="17" style="height:12.75pt" |
||
| − | | class="xl27" height="17" style="height:12.75pt;border-top-style:none;border-left-style:none;text-align:center;"|[[File:Beaker.png|20px]] |
||
| − | | class="xl25" style="border-top-style:none;border-left-style:none;width:106pt;padding-bottom:3px;padding-top:3px;text-align:center;" width="141"|High Conductor |
||
| − | | class="xl25" style="border-top-style:none;border-left-style:none;width:48pt;padding-bottom:3px;padding-top:3px;text-align:center;" width="64"| - |
||
| − | | class="xl25" style="border-top-style:none;border-left-style:none;width:48pt;padding-bottom:3px;padding-top:3px;text-align:center;" width="64"| - |
||
| − | | class="xl25" style="border-top-style:none;border-left-style:none;width:48pt;padding-bottom:3px;padding-top:3px;text-align:center;" width="64"| - |
||
| − | | class="xl25" style="border-top-style:none;border-left-style:none;width:48pt;padding-bottom:3px;padding-top:3px;text-align:center;" width="64"| - |
||
| − | | class="xl26" style="border-top-style:none;border-left-style:none;width:48pt;padding-bottom:3px;padding-top:3px;text-align:center;" width="64" num="0.1"|10.00% |
||
| − | | class="xl25" style="border-top-style:none;border-left-style:none;width:48pt;padding-bottom:3px;padding-top:3px;text-align:center;" width="64"| - |
||
| − | | class="xl25" style="border-top-style:none;border-left-style:none;width:48pt;padding-bottom:3px;padding-top:3px;text-align:center;" width="64"| - |
||
| − | |- height="17" style="height:12.75pt" |
||
| − | | class="xl27" height="17" style="height:12.75pt;border-top-style:none;border-left-style:none;text-align:center;"|[[File:Beaker.png|20px]] |
||
| − | | class="xl25" style="border-top-style:none;border-left-style:none;width:106pt;padding-bottom:3px;padding-top:3px;text-align:center;" width="141"|Volt Generator |
||
| − | | class="xl25" style="border-top-style:none;border-left-style:none;width:48pt;padding-bottom:3px;padding-top:3px;text-align:center;" width="64"| - |
||
| − | | class="xl25" style="border-top-style:none;border-left-style:none;width:48pt;padding-bottom:3px;padding-top:3px;text-align:center;" width="64"| - |
||
| − | | class="xl25" style="border-top-style:none;border-left-style:none;width:48pt;padding-bottom:3px;padding-top:3px;text-align:center;" width="64"| - |
||
| − | | class="xl25" style="border-top-style:none;border-left-style:none;width:48pt;padding-bottom:3px;padding-top:3px;text-align:center;" width="64"| - |
||
| − | | class="xl26" style="border-top-style:none;border-left-style:none;width:48pt;padding-bottom:3px;padding-top:3px;text-align:center;" width="64" num="0.05"|5.00% |
||
| − | | class="xl26" style="border-top-style:none;border-left-style:none;width:48pt;padding-bottom:3px;padding-top:3px;text-align:center;" width="64" num="0.06"|6.00% |
||
| − | | class="xl26" style="border-top-style:none;border-left-style:none;width:48pt;padding-bottom:3px;padding-top:3px;text-align:center;" width="64" num="0.08"|8.00% |
||
| − | |- height="17" style="height:12.75pt" |
||
| − | | class="xl27" height="17" style="height:12.75pt;border-top-style:none;border-left-style:none;text-align:center;"|[[File:Skin.png|20px]] |
||
| − | | class="xl25" style="border-top-style:none;border-left-style:none;width:106pt;padding-bottom:3px;padding-top:3px;text-align:center;" width="141"|Chimera Spark Wing |
||
| − | | class="xl25" style="border-top-style:none;border-left-style:none;width:48pt;padding-bottom:3px;padding-top:3px;text-align:center;" width="64"| - |
||
| − | | class="xl25" style="border-top-style:none;border-left-style:none;width:48pt;padding-bottom:3px;padding-top:3px;text-align:center;" width="64"| - |
||
| − | | class="xl25" style="border-top-style:none;border-left-style:none;width:48pt;padding-bottom:3px;padding-top:3px;text-align:center;" width="64"| - |
||
| − | | class="xl25" style="border-top-style:none;border-left-style:none;width:48pt;padding-bottom:3px;padding-top:3px;text-align:center;" width="64"| - |
||
| − | | class="xl25" style="border-top-style:none;border-left-style:none;width:48pt;padding-bottom:3px;padding-top:3px;text-align:center;" width="64"| - |
||
| − | | class="xl26" style="border-top-style:none;border-left-style:none;width:48pt;padding-bottom:3px;padding-top:3px;text-align:center;" width="64" num="0.5"|50.00% |
||
| − | | class="xl26" style="border-top-style:none;border-left-style:none;width:48pt;padding-bottom:3px;padding-top:3px;text-align:center;" width="64" num="0.48"|48.00% |
||
| − | |- height="17" style="height:12.75pt" |
||
| − | | class="xl27" height="17" style="height:12.75pt;border-top-style:none;border-left-style:none;text-align:center;"|[[File:Beaker.png|20px]] |
||
| − | | class="xl25" style="border-top-style:none;border-left-style:none;width:106pt;padding-bottom:3px;padding-top:3px;text-align:center;" width="141"|Super Conductor |
||
| − | | class="xl25" style="border-top-style:none;border-left-style:none;width:48pt;padding-bottom:3px;padding-top:3px;text-align:center;" width="64"| - |
||
| − | | class="xl25" style="border-top-style:none;border-left-style:none;width:48pt;padding-bottom:3px;padding-top:3px;text-align:center;" width="64"| - |
||
| − | | class="xl25" style="border-top-style:none;border-left-style:none;width:48pt;padding-bottom:3px;padding-top:3px;text-align:center;" width="64"| - |
||
| − | | class="xl25" style="border-top-style:none;border-left-style:none;width:48pt;padding-bottom:3px;padding-top:3px;text-align:center;" width="64"| - |
||
| − | | class="xl25" style="border-top-style:none;border-left-style:none;width:48pt;padding-bottom:3px;padding-top:3px;text-align:center;" width="64"| - |
||
| − | | class="xl26" style="border-top-style:none;border-left-style:none;width:48pt;padding-bottom:3px;padding-top:3px;text-align:center;" width="64" num="0.06"|6.00% |
||
| − | | class="xl26" style="border-top-style:none;border-left-style:none;width:48pt;padding-bottom:3px;padding-top:3px;text-align:center;" width="64" num="0.06"|6.00% |
||
| − | |} |
||
| − | </tabber> |
||
| − | |||
| − | ==Trivia== |
||
| − | *The Vajra is the flagship [[Aragami]] of the original ''[[God Eater (Game)|God Eater]]''. |
||
| − | *Its name comes from a Sanskrit word, [http://en.wikipedia.org/wiki/Vajra Vajra], meaning both thunderbolt and diamond. |
||
| − | *It's right sabertooth is always broken even if it's head is not unbounded. |
||
| − | |||
| − | ==See Also== |
||
| − | *[[Vajra/Gallery]] |
||
[[Category:Aragami]] |
[[Category:Aragami]] |
||
| − | [[Category: |
+ | [[Category:Flagship Aragami]] |
| − | [[Category: |
+ | [[Category:Large sized Aragami]] |
| + | [[Category:Vajra Species]] |
||
| − | </div> |
||
| + | [[Category:God Eater series]] |
||
| + | [[Category:God Eater 2 Rage Burst]] |
||
| + | [[Category:God Eater 3]] |
||
Revision as of 23:22, 12 August 2019
|
Vajra is a large sized tiger-like Aragami first introduced in God Eater that possesses the ability to harness the power of lightning to attack its enemies. Norn Database
The following information can also be found via descriptions of the Aragami found in the NORN Terminal's database. God Eater Burst
A giant Aragami resembling a tiger. Moves so fast and can easily outmaneuver the enemy. Unleashes electric shocks from the cape-like organ on its back. First appeared in southwestern Eurasia, but can now be found throughout the continent. Vulnerable in the front legs, abdomen and tail. When it's activated by rage, stun grenades can immobilize it for a longer time, so use them aggressively. God Eater 2 Rage Burst/Resurrection
An Aragami similar in appearance to a tiger. Toys with enemies with its agile movements. Can loose a powerful electric attack from its "cape," an organ on its back. Native to southeast Eurasia, it is now found throughout the continent. It has multiple weak points, including its head, forelegs, tail and torso. When active, stun grenade duration is increased. ATK Element : Spark Weaknesses : Blaze, Freeze, Divine God Eater 3
An Aragami similar in appearance to a tiger. Toys with enemies with its agile movements. Can loose a powerful electric attack from its "cape," an organ on its back. Its cape crackles with charge when it's ready to release a shock attack, so if you see it light up, it would be wise to avoid aerial attacks for a short while. ATK Element : Spark Weaknesses : Blaze, Freeze, Divine Additional Information
Music Theme
Trivia
| ||
Gallery | ||
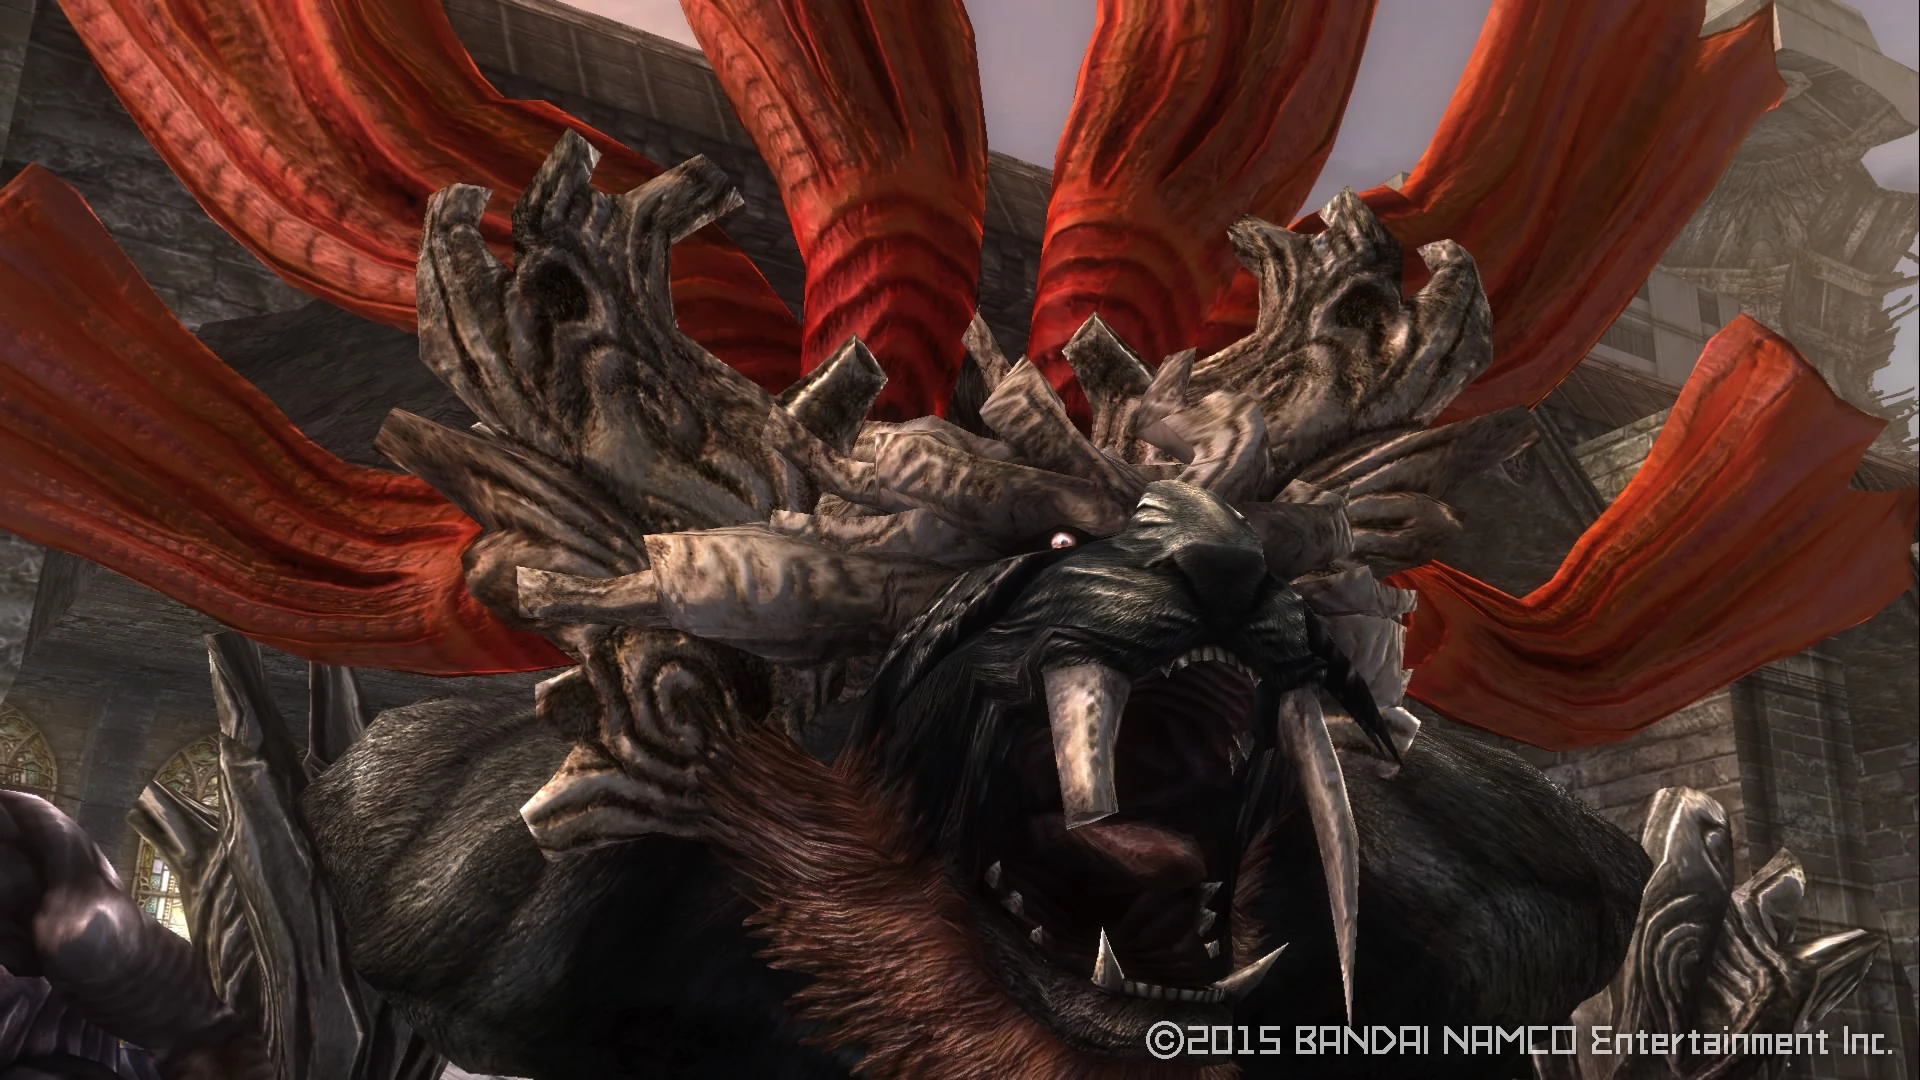 |
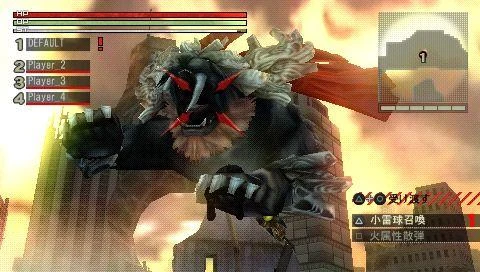 |
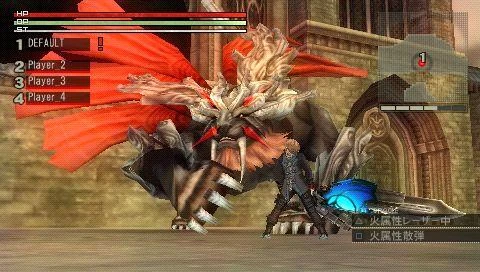 |
| View the Gallery to see more images & videos or add new ones.
Other Large Aragami
| ||